
WordPress 6.2. update is on the way. What changes and new features will this WordPress update bring?
Introduction
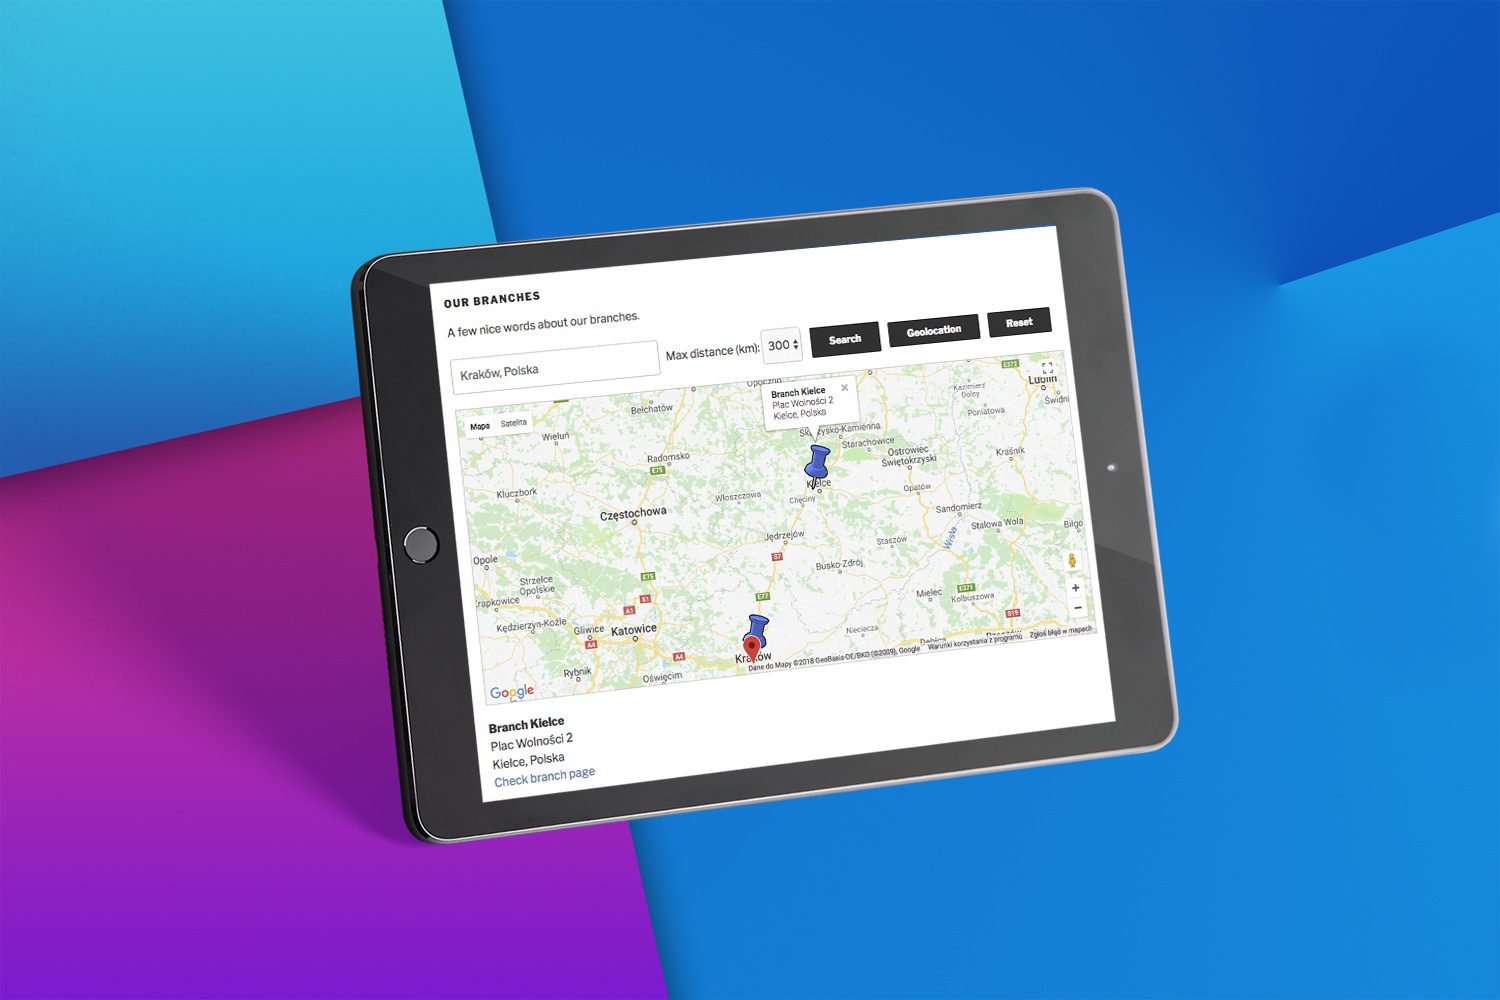
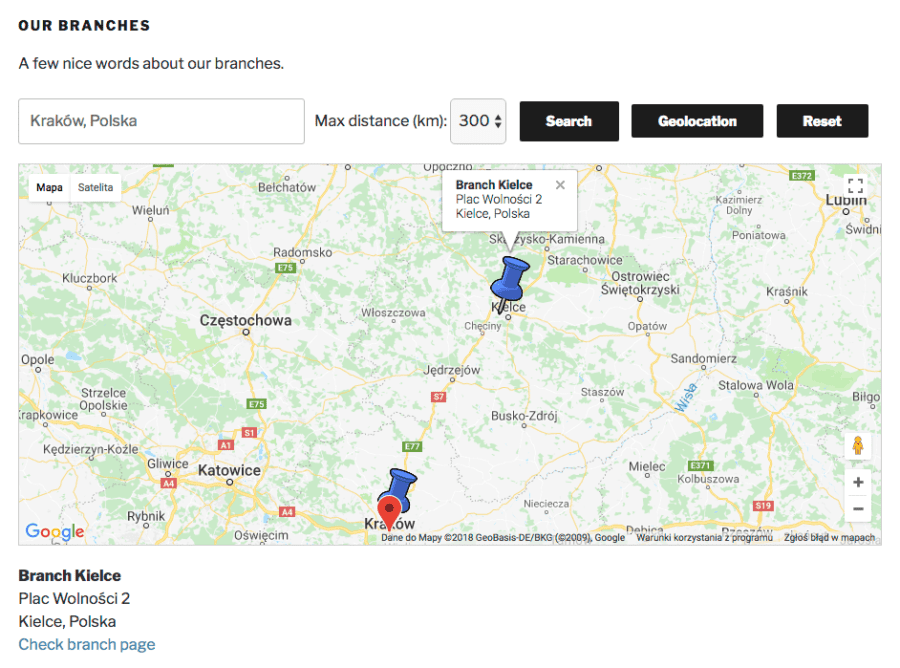
In this tutorial, I’ll show you how to create a map with Google geolocation that allows you to find the company’s branches. It’s important that geolocation works only with https so remember to set it up on your dev.
Motivation
1. As an admin I want to be able to add new branches of my company and my site’s visitors will have the ability to find the nearest branch.
2. Here’s how the find branch page should work:
- Users can enter a location in two ways, in the address field or using the geolocation address field. When using the address field a Google address autocomplete is triggered to help the user enter the searched address. After that user needs to click on Search button to perform the search.
- User can click on Geolocation to do the search based on his geolocation result.
- In both cases, branches searched are narrowed down based on the ‘Max distance’ select.
- Reset button resets the map to the default view.
- When there are any branches found the map’s view is adjusted, a red pin for the found user’s address is shown and blue ones for branches.
- After a user hovers on branch pin a tooltip with the branch address is shown.
- After the branch pin is clicked branch’s info is shown below the map.
So this is what we will build.
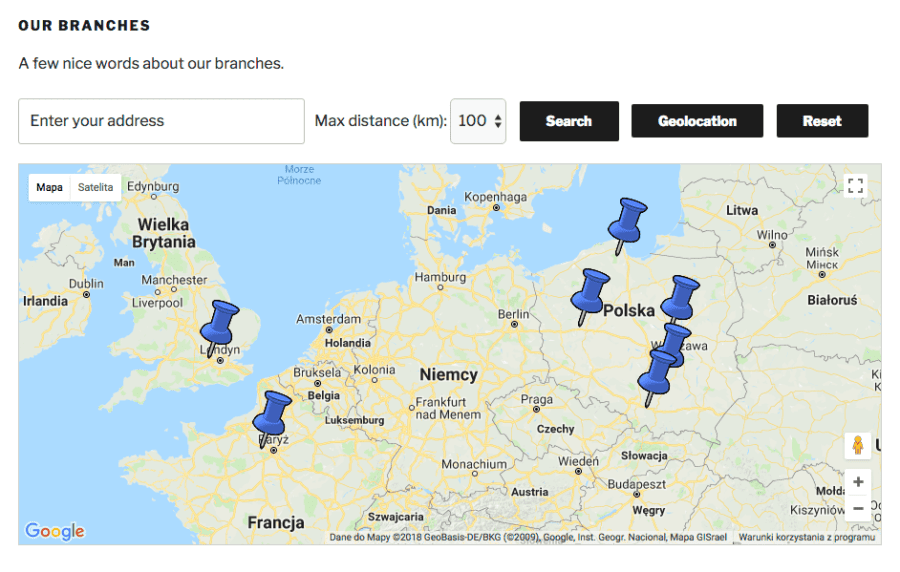
Search results:
What will be used
Here is the list of what I’ll use in the tutorial:
- Twenty Seventeen WordPress theme.
- Custom post type.
- Advanced Custom Fields, in my case version 4.4.12.
- Google Maps API v3: here I’ll use libraries:
– geometry for my map features,
– places for autocomplete search.
Let’s start
Custom post type
I need a branch custom post type because I want to manage each branch, I’ll do that with the file here:
theme-directory/inc/custom-post-type.php
The code is here:
class Custom_Post_Type {
  function __construct() {
    add_action( 'init', array( $this, 'register_branch' ), 999 );
  }

  function register_branch() {
    $args = array(
      'labels' => array(
        'name' => __( 'Branches' ),
        'singular_name' => __( 'Branch' )
      ),
      'menu_icon'  => 'dashicons-hammer',
      'public' => true,
      'has_archive' => false
    );
    register_post_type( 'branch', $args );
  }
}

new Custom_Post_Type();
Now let’s add it to the functions.php file:
require get_parent_theme_file_path( '/inc/custom-post-type.php' );
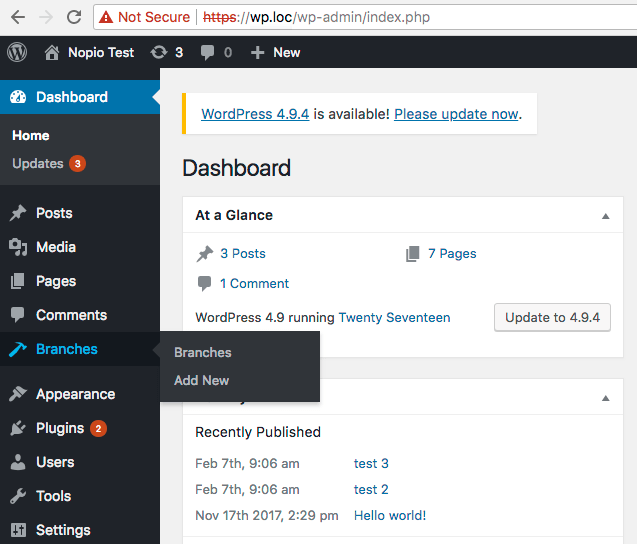
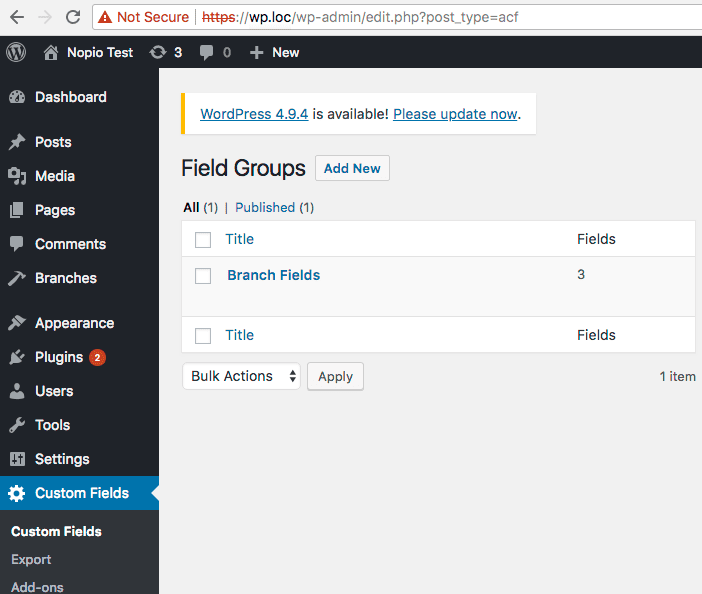
After that in the admin menu, I can see the Branches post type menu as an option on the below image.
Advanced Custom Fields
In this tutorial, I’m using the free version but Pro has the same functionality.
I obtained Google Developer API key and put it in wp-config.php:
define( 'GOOGLE_API_KEY', 'place your key here' );
Now I can enable gmaps features in AFC with some code placed in functions.php.
For free version it’s:
add_filter('acf/fields/google_map/api', 'add_acf_google_map_api');
function add_acf_google_map_api( $api ){
  $api['key'] = GOOGLE_API_KEY;
  return $api;
}
For Pro version it’s:
add_action('acf/init', 'add_acfpro_google_map_api');
function add_acfpro_google_map_api() {
acf_update_setting('google_api_key', GOOGLE_API_KEY);
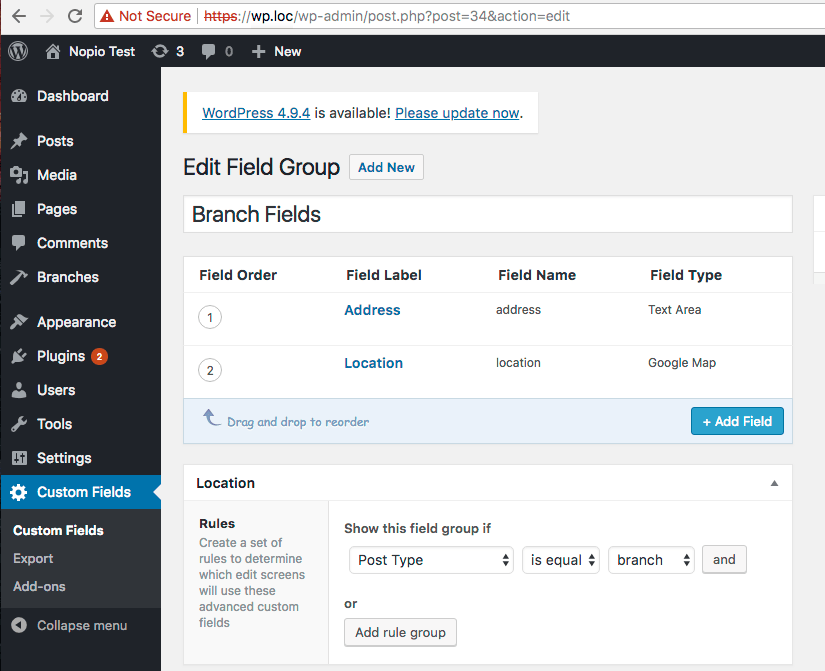
}After that, I’ll create a custom fields group for the branch post type with ‘Add new’ button in the admin’s menu / Custom Fields page, in my case I named the fields group ‘Branch Fields’.
Now I need to add a few fields to this fields group, in my case I added two fields:
- Address, a text area field where the address HTML code is entered, remember to set the field formatting to ‘Convert HTML into tags’.
- Location, for this one the field’s type is set to ‘jQuery / Google Map’. Please remember that Google API needs to be set up to make it work. Also, this field stores chosen map point coordinates that, in PHP, are returned as an array in such format:
array {
  ["address"] => "Franciszka Kniaźnina 12, Kraków, Polska",
  ["lat"]     => "50.0910372",
  ["lng"]     => "19.990163100000018"
}
The important thing to remember is that those fields need to be shown only on the branch posts. To do that I set the Post Type in Location box to ‘branch’.
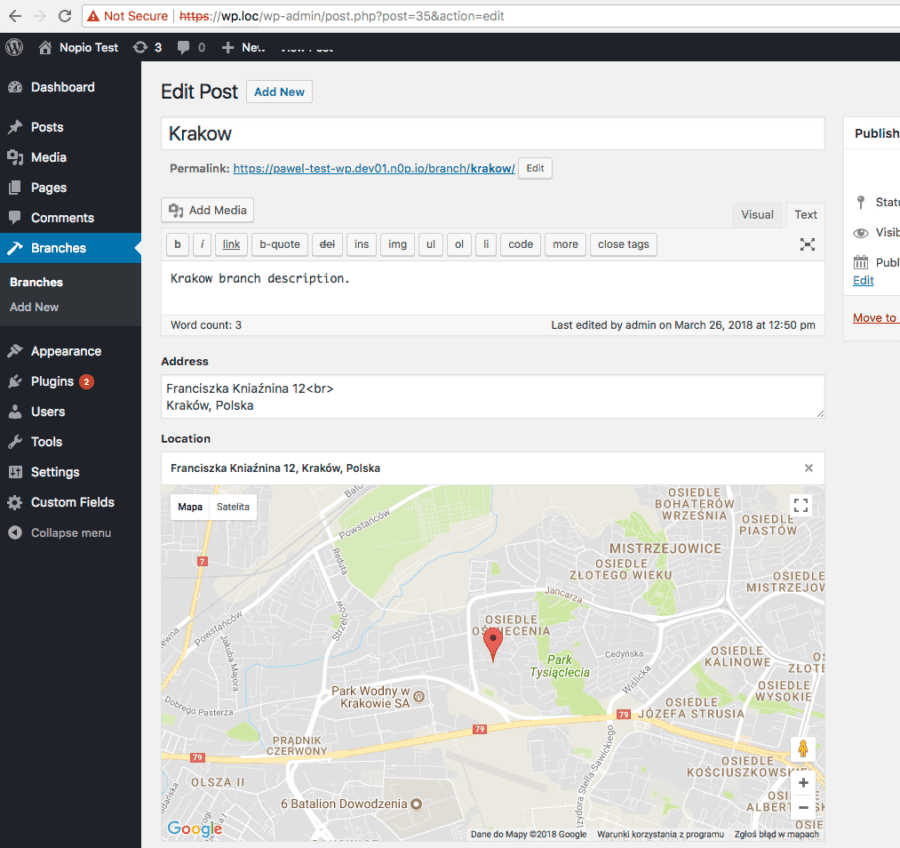
Add branches
I added a few branches. On the image below you can see that I added a basic data for the ‘Krakow’ branch, The most important is the ‘Location’ field that uses Google Map.
‘Our Branches’ Page
It’s time to set up a page where the map with branches will be shown . First, I need to create a page template, the file is named:
theme-directory/branches-template.php
And here is the code:
<?php
/**
 * Template Name: Branches Template
 */
global $post;

get_header(); ?>

<div class="wrap">

  <header class="page-header">
    <h1 class="page-title"><?php echo get_post_field('post_title', $post->ID); ?></h1>
  </header>

  <div id="primary" class="content-area">
    <main id="main" class="site-main" role="main">
      <?php
        echo get_post_field('post_content', $post->ID);
      ?>
      <div id="search-panel">
        <input id="address" type="text" value="" placeholder="Enter your town or postcode">
        Max distance (km): <select id="maxDistance">
          <option>100</option>
          <option>200</option>
          <option>300</option>
        </select>
        <input id="search-btn" type="button" value="Search">
        <input id="geolocation-btn" type="button" value="Geolocation">
        <input id="reset-search-btn" type="button" value="Reset">
      </div>
      <div class="acf-map"></div>
      <div id="map-spinner">
        Loading...
      </div>
      <div id="map-info"></div>
    </main><!-- #main -->
  </div><!-- #primary -->
</div><!-- .wrap -->

<?php get_footer();
The template name is defined in the top as Template Name: Branches Template. After that, you can see in the code that the page title and it’s content are shown. Below, these two there’s a geolocation form with the div.acf-map for a map and div#map-info. After clicking on a branch pin on the map branch, information is shown.
Now I’m creating in WordPress an ‘Our Branches’ page and I’ll assign the above template to that page and this is ready.
Adding google API js
Since I’m using the Twenty Seventeen theme in the functions.php there’s a twentyseventeen_scripts() function where I call google API and my custom branch.js for searching the map:
function twentyseventeen_scripts() {
  /*
   … theme js code removed for clarity…
  */

  if( is_page_template( 'branches-template.php' ) ) {
    wp_enqueue_script( 'google-api', 'https://maps.googleapis.com/maps/api/js?key=' . GOOGLE_API_KEY . '&libraries=geometry,places&callback=initAutocomplete', array(), null, true );
    wp_enqueue_script( 'branches', get_theme_file_uri( '/assets/js/branches.js' ), array(), false, true );
  }
}
add_action( 'wp_enqueue_scripts', 'twentyseventeen_scripts' );
As you can see in the google maps API script params I put my GOOGLE_API_KEY, which is calling the geometry and places libraries and setting initAutocomplete as a callback which is described later. Below you can see that branches.js is called. This is the file where I’ll put all the js code related to the map with geolocation and branch search.
Getting the branches data and autocomplete initiation
In the functions.php I’m adding this code to obtain branches data: post ID, title, address, latitude, longitude and branch post link.
function branches_json() {
  global $post;
  $branches = array();

  $args  = array(
    'post_type' => 'branch',
    'nopaging' => true
  );

  $query = new WP_Query( $args );

  if( $query->have_posts() ) {
    while( $query->have_posts() ) {

      $query->the_post();
      $location = get_field( 'location' );

      $branches[$post->ID] = array(
        'id'     => $post->ID,
        'title'    => get_post_field( 'post_title', $post->ID ),
        'address'  => get_field( 'address' ),
        'lat'    => empty( $location ) ? '' : $location['lat'],
        'lng'    => empty( $location ) ? '' : $location['lng'],
        'link'    => get_permalink(),
      );
    }
    wp_reset_postdata();
  }
  return json_encode( $branches );
}
The above function’s output is printed as a JSON and in footer_scripts() it’s assigned to a javascript branches global variable.
In the function footer_scripts() I created a script where branches JSON is assigned to the branches global variable. Below there’s initAutocomplete() in which autocomplete is initialized for the form’s #address input. As you remember from Adding google API js section above initAutocomplete() is called by google maps api javascript. The script from footer_scripts() is printed only on pages with ‘Branches Template’ template. Function footer_scripts() is placed in the theme-directory/footer.php just above wp_footer() line. Here is the code:
function footer_scripts() {
  if( is_page_template( 'branches-template.php' ) ) { ?>
    <script>
      var branches = <?php echo branches_json(); ?>;
      function initAutocomplete() {
        var field = document.getElementById('address');
        var autocomplete = new google.maps.places.Autocomplete(
            (field),
            {types: ['geocode']}
          );
      }
    </script>

    <?php
  }
}
Branch.js the core of the functionality
Since the code has many functions I’ll focus only on the most important ones.
All the code is called on page ready event:
(function($) {
  //the code
})(jQuery);
In the beginning, I’m defining variables and one helper function:
var MarkerType = { BRANCH:'BRANCH', USER: 'USER' };
var map = null;
var geocoder = null;
var branchMarkerIcon = 'http://maps.google.com/mapfiles/kml/pushpin/blue-pushpin.png';
Init the logic time it is:
At the end of the code I put its core that is called when the page is loaded and ready:
newMap($('.acf-map'));

$('#geolocation-btn').on('click', function() {
  clearInfo();
  codeGeolocation();
});

$('#address').on('keydown', function(e) {
  if(e.which === 13) {
    clearInfo();
    codeAddress();
  }
});

$('#search-btn').on('click', function() {
  clearInfo();
  codeAddress();
});

$('#reset-search-btn').on('click', function() {
  clearInfo();
  showAllBranchMarkers();
});
In the code above, the map is created in the newMap() function and a bunch of the map form’s button listeners are set up there. I think this is pretty self-explanatory so I’m moving on to the most important ones.
The function newMap() receives the map div object and it looks like this:
function newMap( $el ) {
  geocoder = new google.maps.Geocoder();

  var args = {
    zoom     : 16,
    center   : new google.maps.LatLng(0, 0),
    mapTypeId  : google.maps.MapTypeId.ROADMAP,
    markers  : []
  };

  map = new google.maps.Map($el[0], args);

  for (var branchId in branches) {
    addBranchMarker(branchId);
  }

  focusMapOnMarkers([]);
  hideLoader();
}
In the above function, I’m creating a Google API Geocoder object and assigning it to the geocoder variable that will be used later. In the next step, a new map for a passed jQuery div object is created with params set up in args variable and assigned to the map variable. After that, in a loop that reads from the global branches variable, markers are added with the addBranchMarker() function. In the next step, focusMapOnMarkers() is called with an empty array as a param to show all markers on the map. The last line is hideLoader() just to be sure the loader is hidden when the map is loaded.
Let’s see how the addBranchMarker() function is built:
function addBranchMarker(branchId) {
  var branch = branches[branchId];

  var latlng = new google.maps.LatLng( branch['lat'], branch['lng']);

  var marker = new google.maps.Marker({
    position  : latlng,
    map   : map,
    title   : branch['title'],
    address   : branch['address'],
    icon  : branchMarkerIcon,
    custom_type : MarkerType.BRANCH,
    custom_branch_id   : branchId
  });

  map.markers.push(marker);

  var content = '<b>Branch ' + branch['title'] + '</b><br>';
  content += branch['address'];

  google.maps.event.addListener(marker, 'click', (function(marker, i) {
    return function() {
    showLoader();
    $('.acf-map').addClass('overview');
    focusMapOnMarkers([marker]);
    hideLoader();
    $('#map-info').html(content + '<br><a href="' + branch['link'] + '">Check branch page</a>').show();
    };
  })(marker));

  addWindowInfo(marker, content);
}
In the function, based on the passed branchId, the branch’s data is taken from the branches variable and then a branch LatLng object is created. After that, a marker is created with the all required params. The most interesting part is the marker’s custom params:
custom_type : MarkerType.BRANCH,
custom_branch_id: branchId
I want to add a user’s marker and branch markers and with the custom_type param I’m able to distinguish them. The param custom_branch_id is used in focusMapOnMarkers() to show the branches in the user’s max distance range.
The ready marker object is pushed to the map’s marker array and makes it visible on the map. In the next step, the marker’s click event is added and the ‘ onclick’ event focusMapOnMarkers() shows the branch marker in the center. The branch info is then added to the div#map-info below the map.
In the last step, the addWindowInfo() function is called on marker ‘mouseover’ and ‘mouseout’ events and a tooltip with branch data is shown.
You can read more about markers on google developer page here.
I won’t describe in detail the focusMapOnMarkers() function but in general it focuses the map view on the markers passed through the markers params. In case of only one marker map.setCenter([marker position]) and map.setZoom([int]) are used and in case of many markers I’m using the LatLngBounds object passed to map.fitBounds([bounds object]) to adjust the map for showing passed markers.
Time to discover what’s happening when clicking on the ‘Geolocation’ button.
Here is the code:
function codeGeolocation() {
  clearInfo();
  showLoader();
  showBigMap();

  if (navigator.geolocation) {
    navigator.geolocation.getCurrentPosition(function(position) {
    var pos = new google.maps.LatLng(position.coords.latitude, position.coords.longitude);
    calculateDistances(pos);
    }, function() {
    var errorMsg = 'Error: The Geolocation service failed.';
    showInfo(errorMsg, "error-info");
    });
  } else {
    var errorMsg = 'Error: your browser doesn't support Geolocation.';
    showInfo(errorMsg, "error-info");
  }
}
When the navigator.geolocation is supported by the browser the navigator.geolocation.getCurrentPosition() function returns a LatLang object based on the detected user’s position. After that it’s passed to the calculateDistances() function, we’ll get back to this one later.
As I mentioned before, geolocation works only if the site is served via HTTPS. When geolocation is set up a user visiting the page is asked for approval, this is the second requirement for making geolocation work.
Here is a bit more about geolocation.
A very similar function to the previous one is codeAddress():
function codeAddress() {
  clearInfo();
  showLoader();
  showBigMap();

  var address = document.getElementById('address').value;

  if('' === address) {
    focusMapOnMarkers([]);
    hideLoader();
  } else {
    geocoder.geocode({
    'address': address
    }, function(results, status) {
    if (status === google.maps.GeocoderStatus.OK) {
      calculateDistances(results[0].geometry.location);
    } else {
      var errorMsg = 'Geocode was not successful for the following reason: ' + status;
      log(errorMsg);
      showInfo(errorMsg, "error-info");
    }
    });
  }
}
Here, I’m using the geocoder service I initialized in the newMap() function. Based on the address entered in the map’s form, the geocoder returns results. In my case, I’m grabbing LatLng object location from the first result and I’m passing it to calculateDistances().
More about Google Geocoder service here.
The essence of the code calculateDistances():
function calculateDistances(point) {

  addUserMarker(point);

  var errorMsg;

  var coordinates = map.markers.map(function(el) { return { lat: el.getPosition().lat(), lng: el.getPosition().lng() }; });
  var service = new google.maps.DistanceMatrixService();
  var request = {
    origins: [point],
    destinations: coordinates,
    travelMode: google.maps.TravelMode.DRIVING,
    unitSystem: google.maps.UnitSystem.METRIC,
    avoidHighways: false,
    avoidTolls: false
  };

  service.getDistanceMatrix(request, function(response, status) {
    if (status !== google.maps.DistanceMatrixStatus.OK) {
    log('calculateDistances failed');
    errorMsg = 'Error: ' + status;
    log(errorMsg);
    showInfo(errorMsg, "error-info");
    } else {
    var markersToShow = [];
    var origins = response.originAddresses;
    var destinations = response.destinationAddresses;
    var results = response.rows[0].elements;

    for (var i = 0; i < getBranchMarkers().length; i++) {
      if(results[i].status !== google.maps.DistanceMatrixElementStatus.OK) {
      continue;
      }
      var maxDistance = $('#maxDistance').val() * 1000;
      if(results[i].distance.value > maxDistance) {
      map.markers[i].custom_distance = null;
      continue;
      }

      map.markers[i].custom_distance = {
      distance: results[i].distance,
      duration: results[i].duration,
      status: results[i].status
      };

      markersToShow.push(map.markers[i]);
    }

    if(markersToShow.length < 1) {
      errorMsg = 'There is no branch close to the given distance.';
      showInfo(errorMsg, "alert-warning");
      focusMapOnMarkers([]);
      return;
    }

    markersToShow.sort(sortByDistanceDistanceMatrix);

    clearInfo();
    focusMapOnMarkers(markersToShow);
    }
  });
}
First, addUserMarker() shows a user’s position marker on the map. Next, we get all the branch marker’s coordinates we need for calculating the nearest ones and for this purpose we need the google.maps.DistanceMatrixService() which is assigned to a service variable. More about DistanceMatrixService is here. This object requires params that are set up in the request object where a user’s location is passed in an origins array and coordinates are passed as destinations. Also, an important thing is the travelMode that is set up to driving mode because I want to consider the road distance between the user and branches. Having above we can call getDistanceMatrix() that will perform a query to the Google API and in response the below JSON is returned:
{
  "originAddresses": [ "Franciszka Kniaźnina 12, Kraków, Polska" ],
  "destinationAddresses": [ "Franciszka Kniaźnina 12, Kraków, Polska", "Aleje Jerozolimskie 3, Warszawa, Polska", ... ],
  "rows": [ {
    "elements": [ {
      "status": "OK",
      "duration": {
        "value": 12,
        "text": "1 min"
      },
      "distance": {
        "value": 12,
        "text": "12 m"
      }
    }, {
      "status": "OK",
      "duration": {
        "value": 13799,
        "text": "3 godz. 50 min"
      },
      "distance": {
        "value": 294744,
        "text": "295 km"
      },
      ...
    } ]
  }]
}
The originAddresses array contains the user’s location address. The destinationAddresses contains addresses for all branches in the same order as in global branches variable, this is the way they can be matched. The distance and time are in the rows’ elements and they can be matched with destinationAddresses and global branches elements by their array order too.
Based on the response, I’m iterating over all map’s markers and filling in a custom_distance variable with the data from the getDistanceMatrix() results. However, I’m only doing this in case the distance is lower or equal to the given max distance in the form otherwise I’m setting it to null.
The markers that meet the distance criteria are added to the markersToShow array and are sorted by the sortByDistanceDistanceMatrix in the sort() callback function.
The last step is to show sorted markers from markersToShow on the map with the focusMapOnMarkers() function.
Summary
All of this sounds complex and it’s not the easiest thing one can come up with, but it’s also fairly straightforward after understanding the basics of each service. With that knowledge, one can easily build a system like this or similar.
You may ask why not just use a plugin that offers markers integration in the same way we built here. Well, the short answer is that we tried a few free and commercial plugins and none of them did exactly what we needed. If you find one that offers this particular stuff out of the box, please let me know.
Git repository: https://github.com/nopio-pawel-szczepanski/wordpress-branch-map-geolocation