
As you've probably guessed by the title of my article, I still consider Ruby on Rails as a relevant technology that offers a lot of value, especially when combined with ReactJS as it's frontend counterpart. Here's how I approach the topic.
In the last tutorial, you were introduced to the basics of the messages system in Rails. In this part of the series, we’ll focus on the real-time messages using ActionCable – the new Rails 5 feature. If you didn’t read the first part of the series, please do so before doing this tutorial, as I’ll be referring to it.
Set up a project
First, clone the repository from our Github page and set up a database:
$ git clone [email protected]:nopio/facebook-chat-part1.git
$ mv facebook-chat-part1 facebook-chat-part2
$ cd facebook-chat-part2
$ rake db:migrate
$ rake db:seed
You should be able to access the main page at http://localhost:3000.
Channels
The new Rails version introduced a new part of the framework – channels (web-sockets). Channels are classes that communicate between front-end and back-end (client-server) by using web-sockets. Let’s generate our first channel:
$ rails g channel conversation speak
We’ve just generated the ConversationChannel with the speak method. As you probably noticed, this command generated two files:
- app/channels/conversation_channel.rb
- app/assets/javascripts/channels/conversation.js
The ruby file is responsive for performing our edits on the back-end, while the javascript file listens on the front-end. Let’s analyze these files.
class ConversationChannel < ApplicationCable::Channel
  def subscribed
    # stream_from "some_channel"
  end

  def unsubscribed
    # Any cleanup needed when channel is unsubscribed
  end

  def speak
  end
end
Using the subscribed method adds us to a channel. While you’re subscribed to the channel, only a code performed in this certain channel will be sent to all users, that which are connected in the channel.
In other words, only a group of people will get the results of the method. If you subscribed to the “notifications-2” channel, only users within this channel will receive notifications on the front-end. When you are subscribed to the channel? While you entered on a certain page.
Unsubscribed method removes us from certain channel or from all channels.
Speak method (it’s our method name, it can be named to whatever you want) can do almost everything. Creates a record and later renders a part of view, sends an email or logs something.
Now let’s check the javascript file.
App.conversation = App.cable.subscriptions.create("ConversationChannel", {
  connected: function() {
    // Called when the subscription is ready for use on the server
  },

  disconnected: function() {
    // Called when the subscription has been terminated by the server
  },

  received: function(data) {
    // Called when there's incoming data on the websocket for this channel
  },

  speak: function() {
    return this.perform('speak');
  }
});
Two first methods perform the same actions as on back-end but this time on the front-end.
As you probably noticed, the JavaScript file now has a new method called received. It’s performed when we want to render a partial from the back-end.
The speak method calls speak method from the back-end.
Now when you know something more about these files, let’s create a new job which we’ll use later.
$ rails g job message_broadcast
What is a job? A job is a class which performs code by using Redis server and is not connected with a Rails server. It’s completely independant. It can create or update a record, call a model’s method, or do whatever you want!
Real-time stuff
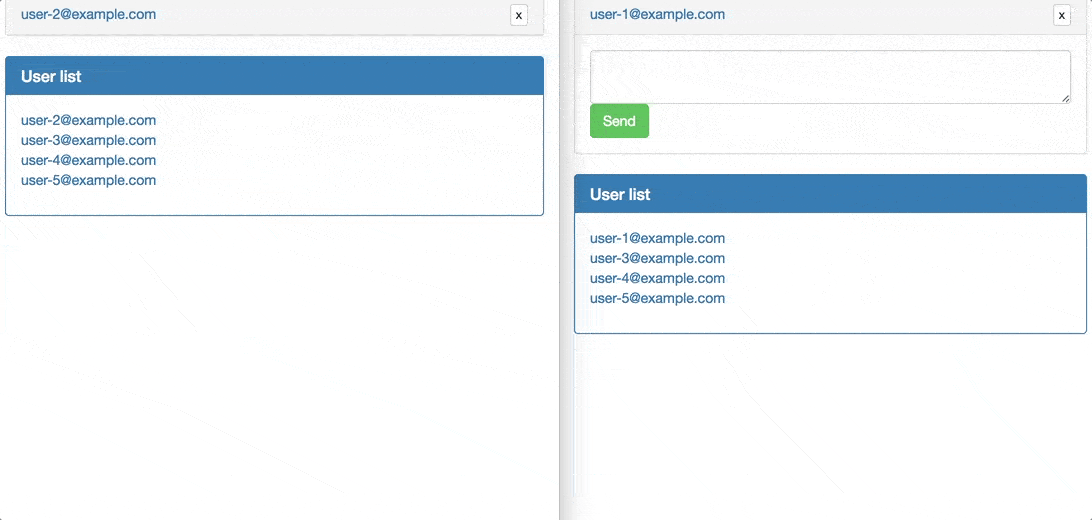
Let’s change the conversations/_conversation.html.erb file. Replace the form_for block with:
<form class="new_message">
        <input name="conversation_id" type="hidden" value="<%= conversation.id %>">
        <input name="user_id" type="hidden" value="<%= user.id %>">
        <textarea name="body" class="form-control"></textarea>
        <input type="submit" class="btn btn-success" value="Send">
      </form>
Our application is available only for logged users. Each user should have their own separate client-server connection and it should be recognized by his own id. To add it, we need to modify the app/channels/application_cable/connection.rb file:
module ApplicationCable
  class Connection < ActionCable::Connection::Base
    identified_by :current_user

    def connect
      self.current_user = find_verified_user
    end

    protected

    def find_verified_user
      if (current_user = env['warden'].user)
        current_user
      else
        reject_unauthorized_connection
      end
    end
  end
end
We added the connect method which is called after a connection. It assigns to the current_user variable an instance of a logged user.
How to get a user? When you log in, everything is stored within a session and we have access to it from a channel. Devise uses warden – it assigns to env[‘warden’] variable all information about the session and authentication. By calling a env[‘warden’].user, you can get a current user! If there is no current user in the env[‘warden’], we throw an error and reject the connection, because someone is not authorized to connect with the server without being logged in.
Now let’s change some code to see ActionCable in action! Modify the conversation.js file:
App.conversation = App.cable.subscriptions.create("ConversationChannel", {
  connected: function() {},
  disconnected: function() {},
  received: function(data) {
    console.log(data['message']);
  },
  speak: function(message) {
    return this.perform('speak', {
      message: message
    });
  }
});
$(document).on('submit', '.new_message', function(e) {
  e.preventDefault();
  var values = $(this).serializeArray();
  App.conversation.speak(values);
  $(this).trigger('reset');
});
We changed the speak and the received methods. Speak runs the speak method on the back-end, sending an object which includes a passed parameter, for example: { message: “Our message” }.
It can be run from a browser’s console like:
App.conversation.speak(values);
Received method logs in the browser’s console the result which is received from the back-end.
We also added a code which is performed while we submit a form – which we added to the _converastion.html.erb file. It serializes form’s values, runs the speak method, and resets its values.
Now let’s modify the back-end. Edit the conversation_channel.rb:
# Be sure to restart your server when you modify this file. Action Cable runs in a loop that does not support auto reloading.
class ConversationChannel < ApplicationCable::Channel
  def subscribed
    stream_from "conversations-#{current_user.id}"
  end

  def unsubscribed
    stop_all_streams
  end

  def speak(data)
    message_params = data['message'].each_with_object({}) do |el, hash|
      hash[el.values.first] = el.values.last
    end

    ActionCable.server.broadcast(
      "conversations-#{current_user.id}",
      message: message_params
    )
  end
end
We changed the subscribed method. We want to create a unique channel for each user.
Why do we need it? Because when you send a message in a conversation, only the users involved in it should be notified about all events that are performed in a conversation’s channel. Moreover, the sender and recipient will receive different information, so we’ll always need to notify two channels after performing code.
Unsubscribed method removes all connected connections.
Speak method builds a hash that’s based on a passed data and sends data to the front-end using the ActionCable.server.broadcast method to the specified channel. Data sent from this method is visible in the received method on the front-end.
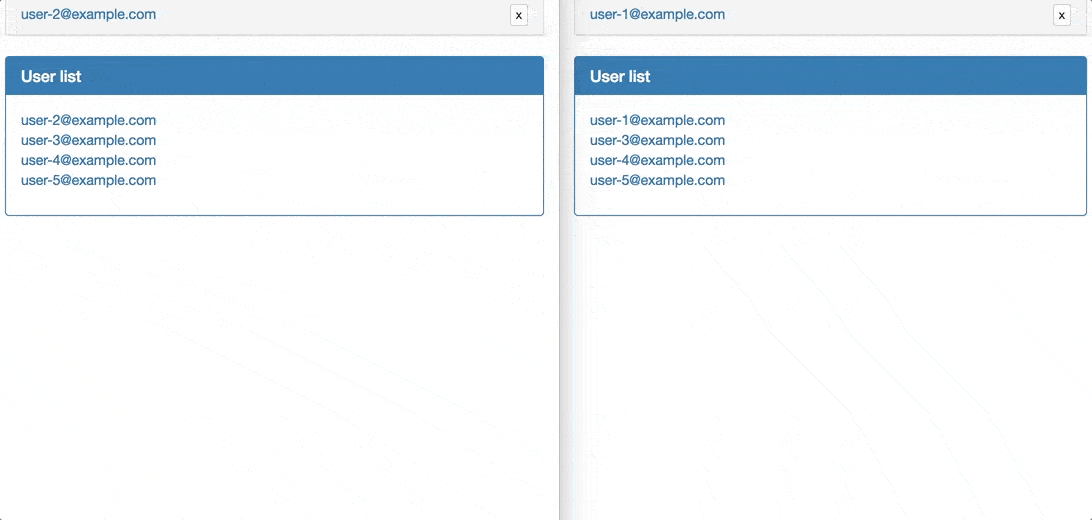
Let’s refresh the http://localhost:3000 page and look at our server log.

When the request is completed, we are informed that we established a connection with the conversations-1 channel. The current_user’s equals to 1. From now, we’ll steam data from this channel and everything will look okay.
Now let’s send a message.
As you can see, after sending a message we received it in the browser’s console! Great! If you check the browser’s console when logged in as different user, you won’t get anything because we’re only streaming data to the specified channel.
Let’s add a code which creates a message based on passed params, and after a message is created, we can use our background job to return an HTML code and pass it to the front-end via web-sockets.
Change the speak method to:
# Be sure to restart your server when you modify this file. Action Cable runs in a loop that does not support auto reloading.
class ConversationChannel < ApplicationCable::Channel
  ...

  def speak(data)
    message_params = data['message'].each_with_object({}) do |el, hash|
      hash[el.values.first] = el.values.last
    end

    Message.create(message_params)
  end
end
class Message < ApplicationRecord
belongs_to :user
belongs_to :conversation
after_create_commit { MessageBroadcastJob.perform_later(self) }
endHow does the after_create_commit callback work? It executes a code or a method passed in params when a record has been created and successfully inserted to a database – when SQL commit is done.
Finally, add some code to the MessageBroadcastJob:
class MessageBroadcastJob < ApplicationJob
  queue_as :default

  def perform(message)
    sender = message.user
    recipient = message.conversation.opposed_user(sender)

    broadcast_to_sender(sender, message)
    broadcast_to_recipient(recipient, message)
  end

  private

  def broadcast_to_sender(user, message)
    ActionCable.server.broadcast(
      "conversations-#{user.id}",
      message: render_message(message, user),
      conversation_id: message.conversation_id
    )
  end

  def broadcast_to_recipient(user, message)
    ActionCable.server.broadcast(
      "conversations-#{user.id}",
      message: render_message(message, user),
      conversation_id: message.conversation_id
    )
  end

  def render_message(message, user)
    ApplicationController.render(
      partial: 'messages/message',
      locals: { message: message, user: user }
    )
  end
end
The perform method is the main method of this class. The whole code inside of it is executed when you call the perform_later method. We pass there a message object, so we can easily get two users to whom a HTML code should be sent to. Later, we’ll call the broadcast_to_sender and the broadcast_to_recipient methods. For now, they look the same, but we will extend the broadcast_to_recipient later.
How do they work? They connect with specified channel and send a conversation_id and a HTML code using a partial. Yes, you read correctly – in Rails 5 we can render a HTML code from any partial or a view by calling the ApplicationController.render method outside a controller.
Now we need to handle a partial rendering, so let’s edit the received method in the conversation.js file:
App.conversation = App.cable.subscriptions.create("ConversationChannel", {
  ...
  received: function(data) {
    var conversation = $('#conversations-list').find("[data-conversation-id='" + data['conversation_id'] + "']");
    conversation.find('.messages-list').find('ul').append(data['message']);

    var messages_list = conversation.find('.messages-list');
    var height = messages_list[0].scrollHeight;
    messages_list.scrollTop(height);
  },
  ...
The code looks similar to the conversations/create.js.erb file. We also search for a specified conversation, based on passed conversation_id, and appended a HTML code within a message to a conversation window and scroll to the bottom of it.
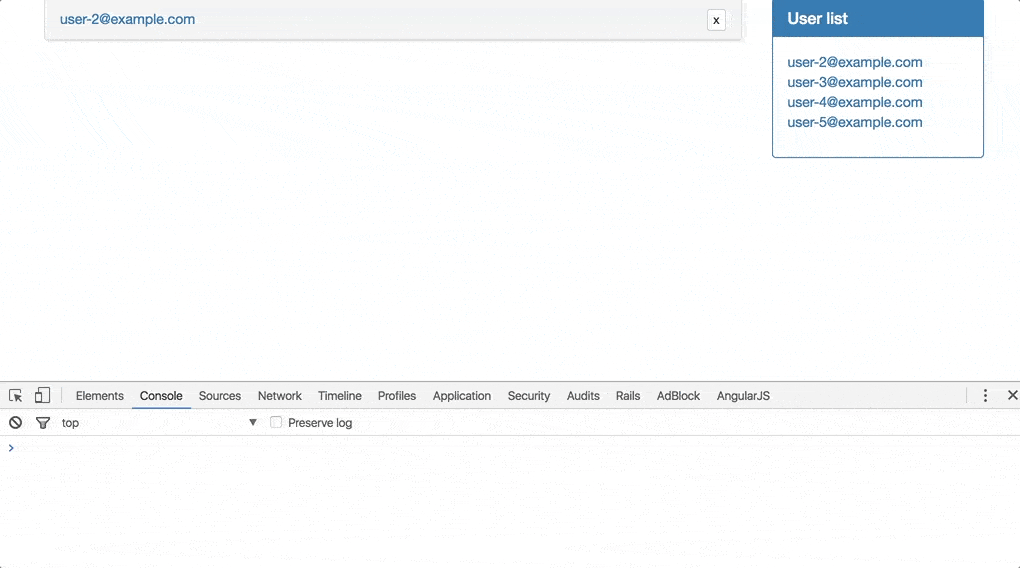
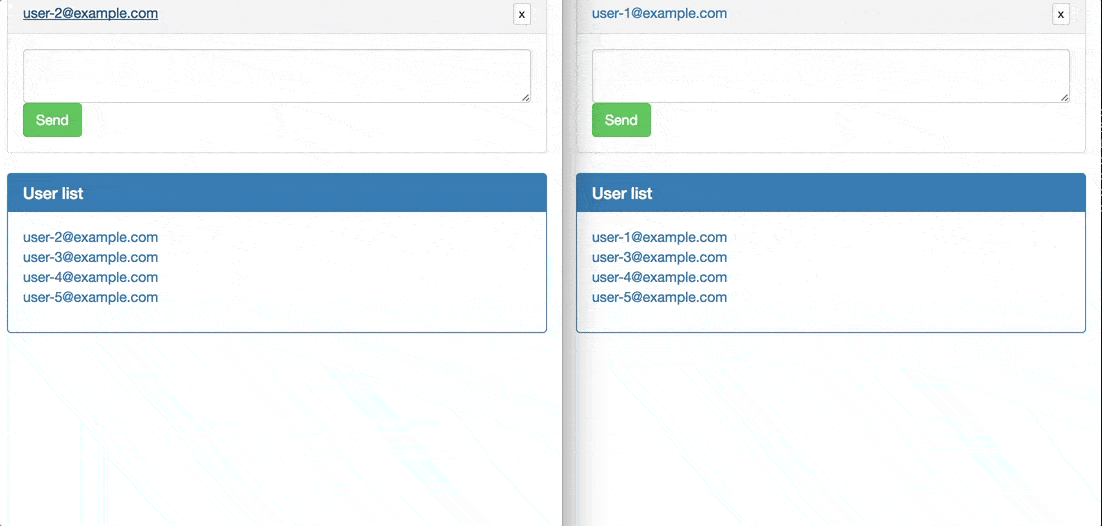
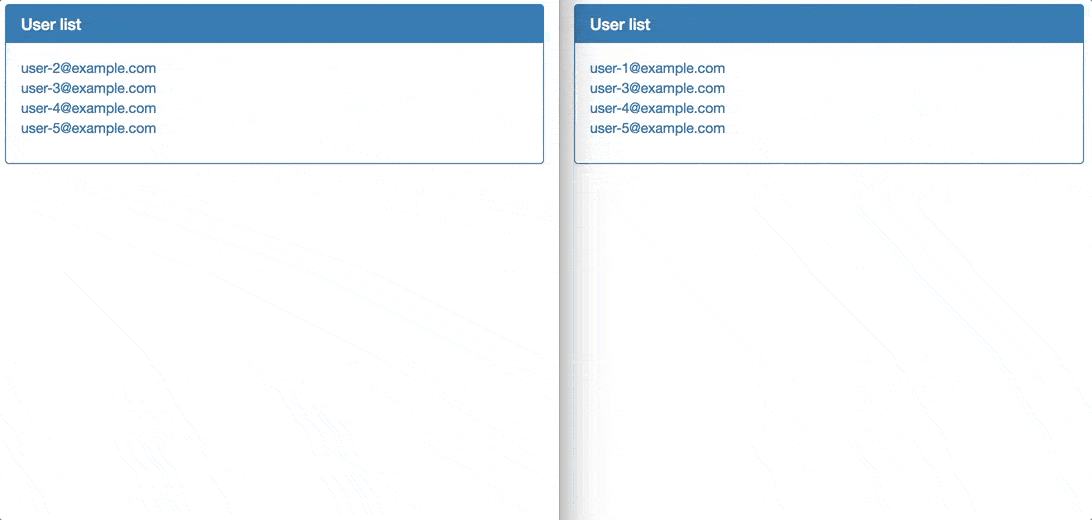
Let’s test how it works. To do so, please log into two different accounts:
Adding a new feature
But what if a user doesn’t have an opened window or it’s minimized and we want to notify them about a new message? We’ll need to render another partial – full conversation window and check three cases:
- If user doesn’t have an opened window
- If user has a minimized window
- If user has an active window
Let’s start by editing the MessageBroadcastJob class. Edit the broadcast_to_recipient method and add the render_window method.
class MessageBroadcastJob < ApplicationJob
  ...

  def broadcast_to_recipient(user, message)
    ActionCable.server.broadcast(
      "conversations-#{user.id}",
      window: render_window(message.conversation, user),
      message: render_message(message, user),
      conversation_id: message.conversation_id
    )
  end

  ...

  def render_window(conversation, user)
    ApplicationController.render(
      partial: 'conversations/conversation',
      locals: { conversation: conversation, user: user }
    )
  end
end
In the broadcast_to_recipient method, we add another HTML partial which is returned on the front-end – in fact, this partial is a full conversation window.
Now we’ll need to update the file, which handles rendering data on the front-end – conversation.js:
App.conversation = App.cable.subscriptions.create("ConversationChannel", {
  ...
  received: function(data) {
    var conversation = $('#conversations-list').find("[data-conversation-id='" + data['conversation_id'] + "']");

    if (data['window'] !== undefined) {
      var conversation_visible = conversation.is(':visible');

      if (conversation_visible) {
        var messages_visible = (conversation).find('.panel-body').is(':visible');

        if (!messages_visible) {
          conversation.removeClass('panel-default').addClass('panel-success');
        }
        conversation.find('.messages-list').find('ul').append(data['message']);
      }
      else {
        $('#conversations-list').append(data['window']);
        conversation = $('#conversations-list').find("[data-conversation-id='" + data['conversation_id'] + "']");
        conversation.find('.panel-body').toggle();
      }
    }
    else {
      conversation.find('ul').append(data['message']);
    }

    var messages_list = conversation.find('.messages-list');
    var height = messages_list[0].scrollHeight;
    messages_list.scrollTop(height);
  },
  ...
It looks a bit tricky. Let’s analyze everything.
In the first if statement (if (data[‘window’] !== undefined)), we check if under the data[‘window’] we pass a partial. If yes, it means that something should be rendered for a recipient. If it’s empty, it means that we should render a code (a message) for a sender.
Let’s go inside the first if. We need to check if a conversation’s window is visible and whether it’s opened or minimized. If it’s not visible on the front end, it means that we should append a whole conversation window partial to the conversations list.
But what if it’s visible? There are two options – the window is either minimized or open. If it’s the first case, we’ll mark that we got a new message by marking a window as green and later appending a message partial to the window. If it’s the second case, we’ll just append a message partial.
Let’s check if it works. In the first case – a conversation window is not visible.
The window is minimized:
The window is opened:
It looks like everything worked as expected! Great!
Remove unneeded code
We don’t need the MessagesController, messages/create.js.erb file, and all routes associated with them anymore, so let’s remove everything.
Conclusion
In this series, we covered how to create a real-time messages application by using Rails 5 without any front-end framework. As you can see, it’s not too complicated. ActionCable provides great tools to create real-time applications without any pain. Keep in mind that a Redis server with many opened channels (web-sockets) requires a bit more memory.
Hopefully you enjoyed this tutorial and will use it in your existing application. Please keep checking our blog for new and useful content!
Full application code can be found here.