
As you've probably guessed by the title of my article, I still consider Ruby on Rails as a relevant technology that offers a lot of value, especially when combined with ReactJS as it's frontend counterpart. Here's how I approach the topic.
Have you ever dreamed about creating your own chat application that works like Facebook Messenger? In this tutorial, we will use the Rails 5 feature called ActionCable to build one without using any front-end framework (expect jQuery – but it’s just a light library). Our goal is to create a real time Rails chat application that sends and shows messages to a recipient instantly without any page refresh.
The final application will look like:

This tutorial is split into two parts. In the first part, we will cover and describe the basics of our application without using ActionCable, including how to start a new conversation and send a basic message. In the second part, we will add real time messages and new message notifications. The tutorial is split to provide detailed information about the Rails 5 new feature – ActionCable, and to better describe how our application works and what every single line of the application does.
Basic setup
Make sure that you have Rails 5.0.0 installed. To check that you do, run:
$ rails -v
Rails 5.0.0.1
If you don’t have the latest version, download it from RubyGems.org running:
$ gem install rails
If you are done with the Rails 5 setup, please create a new application project. We will use SQLite as a database provider.
$ rails new chat
$ cd chat
Now let’s create a separate gemset for our application. To do so, run:
$ touch .ruby-version
$ echo "ruby-2.3.1" > .ruby-version
$ touch .ruby-gemset
$ echo "chat" > .ruby-gemset
Then quit from the directory and re-enter to create a new gemset and to install bundler:
$ cd ..
$ cd chat
$ gem install bundler
$ bundle install
Adding devise and seeds
Let’s add a devise to our Gemfile. The file should look like this (I don’t use coffee-script and other gems):
source 'https://rubygems.org'

gem 'rails', '~> 5.0.0', '>= 5.0.0.1'
gem 'sqlite3'
gem 'puma', '~> 3.0'
gem 'sass-rails', '~> 5.0'
gem 'uglifier', '>= 1.3.0'
gem 'jquery-rails'
gem 'devise'

group :development, :test do
  gem 'byebug', platform: :mri
end

group :development do
  gem 'listen', '~> 3.0.5'
  gem 'spring'
  gem 'spring-watcher-listen', '~> 2.0.0'
end
Then run the following commands:
$ rails generate devise:install
$ rails generate devise user
$ rake db:migrate
Add the authenticate_user! filter to the ApplicationController:
class ApplicationController < ActionController::Base
  before_action :authenticate_user!

  protect_from_forgery with: :exception
end
Create our home page controller and updates routes.rb file:
$ rails g controller home index
Rails.application.routes.draw do
  devise_for :users
  root 'home#index'
end
Replace the application.js and the layouts/application.html.erb files with (we won’t use turbolinks):
//= require jquery
//= require jquery_ujs
//= require_tree .
<!DOCTYPE html>
<html>
  <head>
    <title>Chat</title>
    <%= csrf_meta_tags %>
    <%= stylesheet_link_tag    'application', media: 'all' %>
    <%= javascript_include_tag 'application' %>
  </head>
  <body>
    <div class="container">
      <%= yield %>
    </div>
  </body>
</html>
Replace the seed.rb file and fill it with our database:
password = 'pass123'
1.upto(5) do |i|
  User.create(
    email: "user-#{i}@example.com",
    password: password,
    password_confirmation: password
  )
end
$ rake db:seed
Adding bootstrap
As in every tutorial, we will use Twitter Bootstrap in our CSS. Let’s add it:
Add to the Gemfile:
gem 'bootstrap-sass', '~> 3.3.6'
Bundle it:
$ bundle install
Rename application.css to application.scss and replace it with:
/*
 *= require_tree .
 *= require_self
 */

@import "bootstrap-sprockets";
@import "bootstrap";
We won’t use Bootstrap JS features, so we aren’t adding it to our application.
Adding application models
Our application will have three models (we’ve added one already):
- User
- Conversation
- Message
It’s everything that we will need. One conversation has a recipient and a sender – two users. A message has a sender – a user that belongs to a conversation. Of course, one user will have many messages and conversations.
Let’s add code for this schema and models:
$ rails g model conversation recipient_id:integer:index sender_id:integer:index
Update generated file and add an unique index:
add_index :conversations, [:recipient_id, :sender_id], unique: true
$ rails g model message body:text user:references conversation:references
$ rake db:migrate
Now we need to connect everything together. Add to the User class:
has_many :messages
has_many :conversations, foreign_key: :sender_id
Also we need to edit a bit our conversation model:
class Conversation < ApplicationRecord
  has_many :messages, dependent: :destroy
  belongs_to :sender, foreign_key: :sender_id, class_name: User
  belongs_to :recipient, foreign_key: :recipient_id, class_name: User

  validates :sender_id, uniqueness: { scope: :recipient_id }

  def opposed_user(user)
    user == recipient ? sender : recipient
  end
end
We have two users in the model, so we need to recognize each by adding a custom attributes to the belongs_to method.
We also added uniqueness validation. Remember that we also validate it with index in the database, so even without Rails validation, we can’t add a duplicated record too. It’s awesome!
The opposed_user methods returns an opposed user to the requested user. We will need it later.
Adding first views
If you haven’t already noticed, Facebook supports an awesome chat feature. If you open a chat window once, and close a page or a tab in a browser, it’s still active and appearing on the page when you come back to it later. It looks like this:

How could we add this same feature to our chat application? Simple! We’ll keep in a session array with conversation_ids which we opened. While we close a window, we’ll remove a conversation_id from the array.
First, update the index method in the HomeController:
class HomeController < ApplicationController
  def index
    session[:conversations] ||= []

    @users = User.all.where.not(id: current_user)
    @conversations = Conversation.includes(:recipient, :messages)
                                 .find(session[:conversations])
  end
end
We’re also including other models under the @conversations query to avoid N+1 queries.
Under the @users query, we select all users that are not us. They’ll be displayed on the chat list.
Let’s add views. Replace the home/index.html.erb file with:
<div class="row">
  <div class="col-md-9">
    <ul id="conversations-list">
      <% @conversations.each do |conversation| %>
        <%= render 'conversations/conversation', conversation: conversation, user: current_user %>
      <% end %>
    </ul>
  </div>

  <div class="col-md-3">
    <div class="panel panel-primary">
      <div class="panel-heading">
        <h3 class="panel-title">User list</h3>
      </div>
      <div class="panel-body">
        <ul>
          <% @users.each do |user| %>
            <li><%= user.email %></li>
          <% end %>
        </ul>
      </div>
    </div>
  </div>
</div>
Add the conversations/_conversation.html.erb file:
<li>
  <div class="panel panel-default" data-conversation-id="<%= conversation.id %>">
    <div class="panel-heading">
      <%= link_to conversation.opposed_user(user).email, '', class: 'toggle-window' %>
      <%= link_to "x", '', class: "btn btn-default btn-xs pull-right" %>
    </div>

    <div class="panel-body" style="display: none;">
      <div class="messages-list">
        <ul>
          <%= render 'conversations/conversation_content', messages: conversation.messages, user: user %>
        </ul>
      </div>
    </div>
  </div>
</li>
Add the conversations/_conversation_content.html.erb:
<% messages.each do |message| %>
  <%= render message, user: user %>
<% end %>
Add the messages/_message.html.erb file:
<li>
  <div class="row">
    <div class="<%= user.id == message.user_id ? 'message-sent' : 'message-received' %>">
      <%= message.body %>
    </div>
  </div>
</li>
Add styles to the application.scss file:
ul {
  padding-left: 0px;
  list-style: none;
}
What have we just added? Please refresh the page and check.

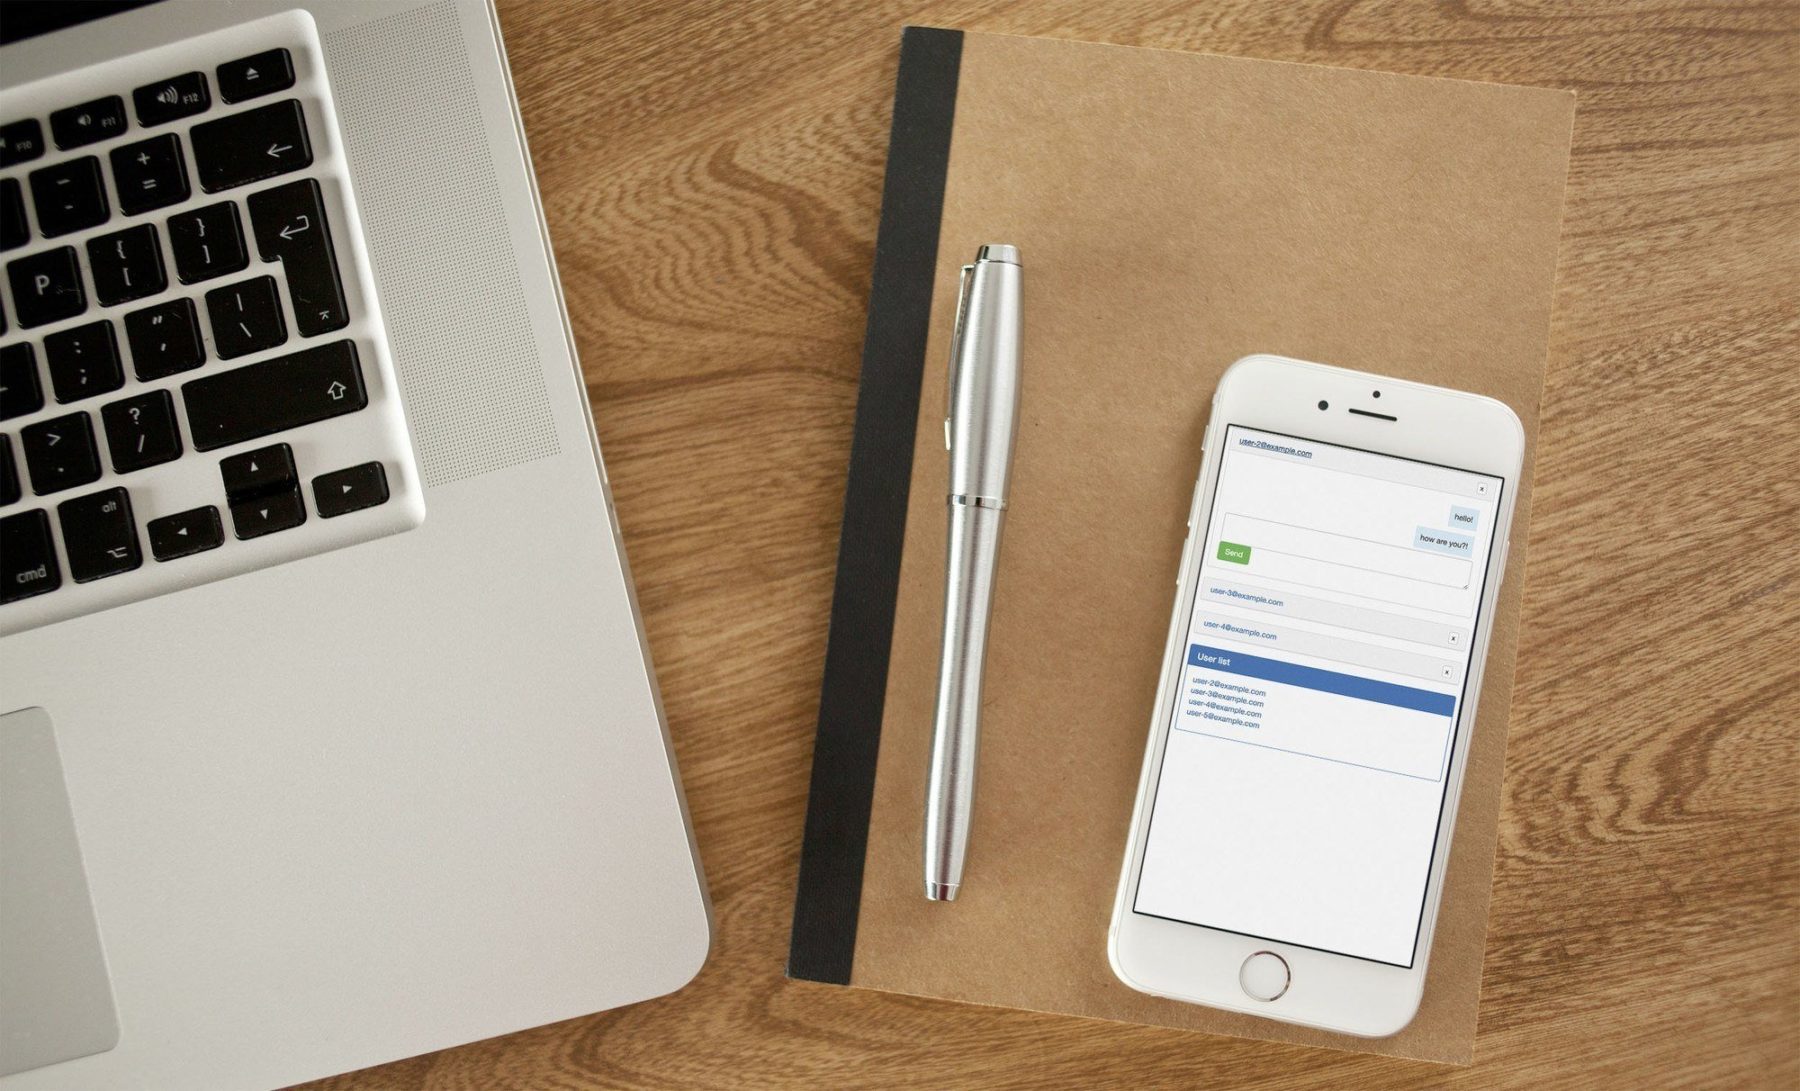
For now, the left part of the page is empty for displayed conversations. On the right, there is a user list that contains all users. We will now be able to start a conversation with any of them!
Starting a conversation
We have everything prepared for starting a new conversation, now let’s add some code!
Start by adding our new resource to the routes.rb file:
Rails.application.routes.draw do
  root 'home#index'

  devise_for :users

  resources :conversations, only: [:create]
end
Update the conversation.rb file:
class Conversation < ApplicationRecord
  has_many :messages, dependent: :destroy
  belongs_to :sender, foreign_key: :sender_id, class_name: User
  belongs_to :recipient, foreign_key: :recipient_id, class_name: User

  validates :sender_id, uniqueness: { scope: :recipient_id }

  scope :between, -> (sender_id, recipient_id) do
    where(sender_id: sender_id, recipient_id: recipient_id).or(
      where(sender_id: recipient_id, recipient_id: sender_id)
    )
  end

  def self.get(sender_id, recipient_id)
    conversation = between(sender_id, recipient_id).first
    return conversation if conversation.present?

    create(sender_id: sender_id, recipient_id: recipient_id)
  end

  def opposed_user(user)
    user == recipient ? sender : recipient
  end
end
We added the between scope. It returns a conversation between two requested users. The get method is also a new code. It tries to get a conversation between two users – and if it’s present, it returns it. If there isn’t any, it creates a new one.
Add the ConversationsController:
class ConversationsController < ApplicationController
  def create
    @conversation = Conversation.get(current_user.id, params[:user_id])

    add_to_conversations unless conversated?

    respond_to do |format|
      format.js
    end
  end

  private

  def add_to_conversations
    session[:conversations] ||= []
    session[:conversations] << @conversation.id
  end

  def conversated?
    session[:conversations].include?(@conversation.id)
  end
end
In the create method, we just get a conversation between a current user and requested user. If in the session there is no added conversation_id yet, we’ll add it, if not, we’ll just respond with a js file.
Update in the home.index.html 18th line, from:
<li><%= user.email %></li>
To:
<li><%= link_to user.email, conversations_path(user_id: user), remote: true, method: :post %></li>
Now, create the conversations/create.js.erb file:
var conversations = $('#conversations-list');
var conversation = conversations.find("[data-conversation-id='" + "<%= @conversation.id %>" + "']");

if (conversation.length !== 1) {
  conversations.append("<%= j(render 'conversations/conversation', conversation: @conversation, user: current_user) %>");
  conversation = conversations.find("[data-conversation-id='" + "<%= @conversation.id %>" + "']");
}

conversation.find('.panel-body').show();

var messages_list = conversation.find('.messages-list');
var height = messages_list[0].scrollHeight;
messages_list.scrollTop(height);
What are we doing here? First of all, we try to find an existing conversation window in the ‘#conversations-list’ div. If it doesn’t exist (length !== 1), we add to the ‘#conversations-list’ div a new conversation. If we add it, we need to reassign to the conversation variable added element. Later, we call the show() method to display a conversation’s window.
Finally, we check the height of the window and scroll to the bottom of it. If we send a new message, we should always be at the bottom of a conversation.
The application home page should look like (it depends how many windows you have opened):

Closing and minimizing a conversation
What happens if we open a conversation by a mistake? We can’t close it or even minimize yet. Let’s add these features!
Update the routes.rb file:
Rails.application.routes.draw do
  root 'home#index'

  devise_for :users

  resources :conversations, only: [:create] do
    member do
      post :close
    end
  end
end
Replace the 5th line in the _converastion.html.erb file with:
<%= link_to "x", close_conversation_path(conversation), class: "btn btn-default btn-xs pull-right", remote: true, method: :post %>
Add the close method to the Conversations controller:
class ConversationsController < ApplicationController
  ...

  def close
    @conversation = Conversation.find(params[:id])

    session[:conversations].delete(@conversation.id)

    respond_to do |format|
      format.js
    end
  end

  ...
end
It removes the requested converastion_id from the session and closes a window on the front-end.
Add the close.js.erb file:
$('#conversations-list').find("[data-conversation-id='" + "<%= @conversation.id %>" + "']").parent().remove();This one line finds requested div and removes it from the body tag.
Add method which is responsible for minimizing a window:
//= require jquery
//= require jquery_ujs
//= require_tree .

(function() {
  $(document).on('click', '.toggle-window', function(e) {
    e.preventDefault();
    var panel = $(this).parent().parent();
    var messages_list = panel.find('.messages-list');

    panel.find('.panel-body').toggle();
    panel.attr('class', 'panel panel-default');

    if (panel.find('.panel-body').is(':visible')) {
      var height = messages_list[0].scrollHeight;
      messages_list.scrollTop(height);
    }
  });
})();
It runs a jQuery toggle() method and scrolls to the bottom of the window if it’s visible.
Now you should be able to open, close, and minimize a conversation window!
Sending a message
Now for the most important feature, sending a new message! It will be very simple, we just need to create a new record and append it to a conversation’s window.
Let’s edit the routes.rb file:
resources :conversations, only: [:create] do
    ...
    resources :messages, only: [:create]
end
Add the form to the _converastion.html.erb file after the ‘.message-list’ div.
<li>
  <div class="panel panel-default" data-conversation-id="<%= conversation.id %>">
    <div class="panel-heading">
      <%= link_to conversation.opposed_user(user).email, '', class: 'toggle-window' %>
      <%= link_to "x", close_conversation_path(conversation), class: "btn btn-default btn-xs pull-right", remote: true, method: :post %>
    </div>

    <div class="panel-body" style="display: none;">
      <div class="messages-list">
        <ul>
          <%= render 'conversations/conversation_content', messages: conversation.messages, user: user %>
        </ul>
      </div>
      <%= form_for [conversation, conversation.messages.new], remote: true do |f| %>
        <%= f.hidden_field :user_id, value: user.id %>
        <%= f.text_area :body, class: "form-control" %>
        <%= f.submit "Send", class: "btn btn-success" %>
      <% end %>
    </div>
  </div>
</li>
Add the MessagesController:
class MessagesController < ApplicationController
  def create
    @conversation = Conversation.includes(:recipient).find(params[:conversation_id])
    @message = @conversation.messages.create(message_params)

    respond_to do |format|
      format.js
    end
  end

  private

  def message_params
    params.require(:message).permit(:user_id, :body)
  end
end
The create method creates a new message object and responds with the js file.
Create the create.js.erb file inside the messages directory:
var conversation = $('#conversations-list').find("[data-conversation-id='" + "<%= @conversation.id %>" + "']");
conversation.find('.messages-list').find('ul').append("<%= j(render 'messages/message', message: @message, user: current_user) %>");
conversation.find('textarea').val('');
This JavaScript code finds the requested conversation window and appends a partial with a new message.
Add styles to the application.scss file to set a max height of a window:
.messages-list {
  max-height: 200px;
  overflow-y: auto;
  overflow-x: hidden;
}


.message-sent {
  position: relative;
  background-color: #D9EDF7;
  border-color: #BCE8F1;
  margin: 5px 20px;
  padding: 10px;
  float: right;
}


.message-received {
  background-color: #F1F0F0;
  border-color: #EEEEEE;
  margin: 5px 20px;
  padding: 10px;
  float: left;
}
Now we can test our new feature! It should look like:

Conclusion
In a few steps, we created a fully working chat application without touching any front-end framework. It’s not real time chat yet, but in the next part of the application we will cover ActionCable and use it to build awesome features!
I hope that you liked this tutorial and you can subscribe to our newsletter for additional information about the next!
Whole code could be found here.