
As you've probably guessed by the title of my article, I still consider Ruby on Rails as a relevant technology that offers a lot of value, especially when combined with ReactJS as it's frontend counterpart. Here's how I approach the topic.
In the first part of the React on Rails series, we created a simple application which allowed us to add events and search for them. But if we added some by accident or misspelled a name or description, we couldn’t edit or remove the mistake. In this part of the tutorial, we will focus on editing, destroying, and sorting events.
Let’s prepare
I will be using the same code from the first series of the tutorial. If you didn’t read the first part of the series, you can find it here. You can clone the whole project from Github. Just follow the lines below:
$ git clone [email protected]:nopio/react_example.git
$ cd react_example
$ git reset --hard 0608d8f
$ rake db:migrate
$ rake db:seed
$ rails s
Your changes are now set to the last commit from the first part of the series and you can start coding the next features!
Deleting an event
We need to edit our table and add a new column for the action buttons.
Let’s start by adding the new <th> tag to the EventTable component and edit two HTML classes:
<tr>
  <th className="col-md-2">Name</th>
  <th className="col-md-2">Date</th>
  <th className="col-md-3">Place</th>
  <th className="col-md-3">Description</th>
  <th className="col-md-2">Actions</th>
</tr>
Also edit and add a new tag to the Event component, which will keep all buttons for needed actions and empty handleDelete method:
We’ve updated our views and have a button to destroy an event, but our back-end is not ready for this action yet. Add the destroy method, set_event method and before_action to the top of the EventsController.
We need to modify our routes, so let’s add the destroy route to the event resources:
Back-end is ready, so let’s change the front-end and add the AJAX method, which will hit our back-end. Extend the Event component:
This method calls an AJAX request, which removes a requested event from our database, and if everything goes successfully, it calls passed method from the EventTable component – handleDeleteRecord and passes it to the event json. Yes, the call method passed from the another component – so let’s add it to the EventTable component.
We just added the method which calls again for another comonent’s method – handleDeleteRecord from the EventApplication component. Also, added in the forEach loop handleDeleteRecord={this.handleDeleteRecord}, which passes to the Event component via props, EventTable’s handleDeleteRecord method. Remember that we can pass it via props methods too.
Finally, let’s modify the EventApplication component:
In the 16th line, we pass EventApplication’s handleDeleteRecord method to the EventTable.
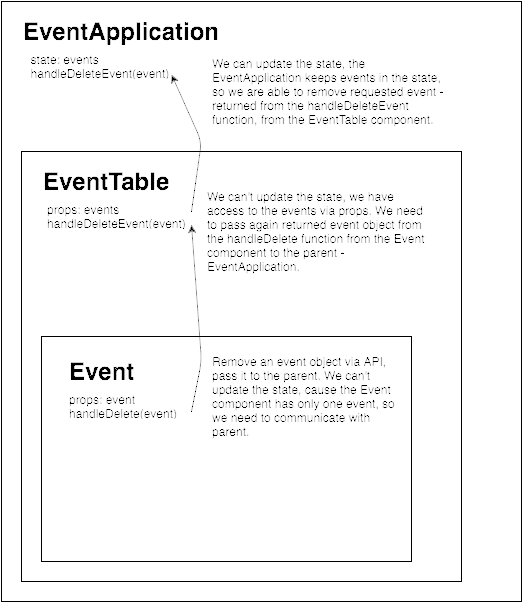
The handleDeleteRecord method searches for the requested event and removes it from an array. If it’s done, we update all the state’s events, calling the setState method.
The picture below explains why our logic looks like this:
Editing an event
Our back-end is not ready for editing an event yet. First, add the update method in the EventsController to edit our routes.rb file.
I just added the update method. If everything goes right, we just return a JSON object, if not – we return the 422 status code. I also added the update method to the before_action – set_event.
Lastly, we need to modify the routes and add the update method.
Okay, now we are finished with the back-end. Let’s add logic to the front-end – ReactJs.
First, we need to think about how should we create the new feature and edit a requested event. There must obviously be a form which allows us to change an event’s values and updates, but how should we do it? The best idea would be to render it inline, in a table row instead of an event.
React provides something like “partials views”. “Partials views” are a function that returns a part of a HTML code. They can be used inside the render function, in a component.
For example, we can write a function which renders part of a code regarding to a condition, like:
Now that we know how to manipulate with a code rendering, let’s write our next feature! Now we’ll focus on the Event component. First, we need to mark if an event is in an editable state or not. To do so, we should add a new state – edit.
During the first render, it should be set to false, because we want to render a record and not an edit form.
getInitialState: function() {
  return { edit: false };
}
Let’s change our render function, which will render a code regarding to the edit variable.
render: function() {
  if (this.state.edit) {
    return(this.renderForm());
  } else {
    return(this.renderRecord());
  }
}
Once we’re done with it, let’s add the functions which render the code. Basically, the renderRecord function is the old render function, we just add the button which allows to edit an event.
We added the handleToggle function to the onClick event in the button, which allows us to edit an event. This simple function changes the state of an event (edit) from the opposite value to the last value.
handleToggle: function(e) {
  e.preventDefault();
  this.setState({ edit: !this.state.edit });
}
Let’s add the renderForm function.
If you click on the Edit button, your form should look like this:

Basically, in each <td> tag, instead of rendering an event’s name or a place as a text, we render an input with current value of each event’s field. We also change the Destroy/Edit buttons to the Save/Cancel. By pressing the Cancel button, we just change the state (edit) value to false – to call the renderRecord function. By pressing the “Save” button we call the updateRecord function.
But how does the updateRecord function look?
At the beginning, we should check if all fields are filled by calling the validRecord function.
If everything is filled properly, we send an AJAX request which updates a requested event in the database. If something goes wrong during the request, we prompt an alert with failure message. But if everything is okay, then we call the handleUpdateRecord function passed from the EventTable component and call the setState function to update the edit state to false – to hide the form and show a normal record in the table.
Your Event component should look like:
Now let’s add the handleUpdateRecord function to the EventTable component and pass it to the Event component.
As you can see, the handleUpdateRecord function calls the handleUpdateRecord from the parent – EventAplication. It works like the handleDeleteRecord method, which was previously covered.
The last function is connected with updating an event – the handleUpdateRercord in the EventApplication component.
It replaces an old event object with the new values returned from the child’s function (handleUpdateRecord), and updates the state by calling the setState function.
We also pass the handleUpdateRecord to the child’s EventTable component.
Great! We’re done with editing and removing an event.
Sorting the events
This will be one of the most complicated features in our application. Again, we will need to prepare a method in the EventsController and work on the front-end.
First, modify the index method in the EventsController:
We simply return all events from our database and order them by specified field and order. Remember, the order method is not safe from SQL Injections. We can’t run it like:
Event.order(“#{params[:sort_by]}” “#{params[:order]}”)To sanitize the query, I added the two methods:
- sort_by
- order
If a requested param is not found in the allowed params list, it’s set to the default one.
You might be asking yourself, why are we sorting the event on the back-end? The answer is that it’s more powerful to sort everything on a back-end. An example of this would be date comparison. JavaScript treats our dates as strings. If we want to sort them in the proper way, we need to convert them into dates. This needs more code and time. By running a single SQL query, we can sort everything (but not so much with SQLite 🙂 ).
Great! We’re done with the back-end. Let’s add a small change to our styles. Add the following lines to the application.scss:
.sortable {
  cursor: pointer;
}
When we will hover on a sortable field, our cursor will be changed to a pointer. It might be helpful to identify if we can sort by a hovered field.
Let’s add the SortColumn component.
For now, it just renders a column name, marks if it’s active, and shows an arrow, which points the sort order based on passed props – sort order name, column name and direction.
We need to render the new components in the EventTable. To do so, let’s add these changes:
In the <th> tags, instead of raw column name, we render the SortColumn components with valid names.
The last step is to add the new states to the EventApplication component and pass them to the EventTable.
We set the default order field name to the “name” and order direction to the “asc”. After these changes, your applications should look like:

Everything is prepared for the last method which sorts events. So let’s add it. Modify the sort_column.js.jsx file:
We implemented the handleSort method, which calls the parent’s method handleSortColumn and passes the column name and order to it. The handleSort is called when we click on a column in the event’s table: name, date, place or description.
Let’s add the handleSortColumn to the EventTable component and pass it to the SortColumn components.
It calls the handleSortColumn from the parent – EventApplication.
Now for the last method and change in this series! The final handleSortColumn method, which calls an AJAX request and sorts our table!
It checks if we click for the second time on the same column and to change the sorting direction, if not, it sets order direction to the default value – asc. Later, it makes an AJAX request. After everything goes successfully, it updates the state in the EventApplication component, setting the new value for the sorting column, order, and updates the list of all events.
Remember to pass this method to the EventTable component!
Conclusion
This is the end of the series ‘React on Rails’. In this part of the tutorial, we added three features: deleting an event, editing it, and sorting the whole table by a column.
Hopefully you enjoyed this series! The whole source code can be found here.
Each chapter was included in a single commit, so if you’re lost somewhere, you can compare your source code with a commit.