
As you've probably guessed by the title of my article, I still consider Ruby on Rails as a relevant technology that offers a lot of value, especially when combined with ReactJS as it's frontend counterpart. Here's how I approach the topic.
Front-end frameworks are getting more popular these days. They offer a lot of features, are fast, and can speed up your UI a lot. Sometimes it’s hard to decide which would be best suited for our application, as adding a new front-end framework to a big project could be problematic. This can be especially hard if you don’t have any API, and you need to rebuild part of the application, create new views, move a front-end logic to the framework, or rewrite features.
So we present to you ReactJS – a front-end framework made by Facebook in 2013. It’s lightweight, has a big and growing community, and is not too complicated! It’s really cool, trust me!
What is ReactJS?
When I think about React, my first thought is a component, as mostly everything in React is a component. For example: we have a page, and inside this page is a search form and a table with records. Inside the table, you’ll find single records. Everything is a component. Page is the main component where everything is stored, including the search form and the table. The table is also a component, which contains records, another components.
Maybe it would be easier to imagine it by looking at the image below:

As you can see, before creating an application you must think how to split everything into to a components. Of course, components can also communicate between each other. We can group the communication into two types:
- Parent-children communication
- Children-parent communication
I will describe it later on what these types of communication are and what they do by using examples. So why is React great? You can simply add any component to an existing page/web app.
Let’s say that you want to add only a custom search form, which will prompt results based on a search query. You don’t need to rewrite the whole page. You just need to create a simple search component, which will handle everything from making requests to the applications for any typeaheads, to submitting the form. It’s how Airbnb.com uses React.
Here is an example:

As you can see, only a few things are made in React, not a whole page. How do I know this? I installed a simple plugin made by Facebook, which works as a React inspector (you can get it here). It inspects all of React’s components by showing their info: props, state (about these two first words later), and html tags.
Also a React detector is a great tool. It displays an icon, which shows if a page uses React. If it does, the icon is blue. (you can get it from here)
![]()
Now that you know a little more about React, let’s move on to the most important thing in this article – the tutorial! We will create a simple application that uses React on the front-end and Rails on the back-end. It will allow us to add new events in our calendar, search for them, and in the next part of the tutorial… oh, just wait for the next part 🙂 !
As you probably already know and use Rails, in this tutorial I want to focus on React.
The final results of this tutorial should look like:

Ok, let’s start!
1. Create a clean application
I use the newest version of Rails – 5.0.0 and SQLite as a database.
$ rails new react_example
$ cd react_example
2. Add React and Bootstrap gems a to the Gemfile
Let’s add these two gems to our Gemfile: ‘react-rails’ and ‘bootstrap-sass’. After cleanups and adding them, your Gemfile should look like this. Later bundle everything:
$ bundle install
3. Remove turbolinks
Sometimes turbolinks don’t work with front-end frameworks. The best idea would be to remove them from our application. We should remove them from the Gemfile (I have already removed them in the step 2), from the application.js:
//= require turbolinks
and from the app/views/layouts/application.html.erb, to keep only these lines.
4. Add React to the project
We’ve added React to our Gemfile, but we’re not finished! We still need to add all JavaScript files and choose a type of environment. Please add under the config/environments/development.rb, after the Rails.application.configure do line:
config.react.variant = :development
Now generate all needed files:
$ rails g react:install
Running via Spring preloader in process 63944
      create  app/assets/javascripts/components
      create  app/assets/javascripts/components/.gitkeep
      insert  app/assets/javascripts/application.js
      insert  app/assets/javascripts/application.js
      insert  app/assets/javascripts/application.js
      create  app/assets/javascripts/components.js
5. Add Bootstrap
Ok, let’s add some styles to our application. First, rename the application.css to the application.scss under the app/assets/stylesheets – in order to use imports. Now add these lines after the manifest:
@import "bootstrap-sprockets";
@import "bootstrap";

.container {
  margin-top: -20px;
}
You can check the whole file here.
6. Let’s generate our resource.
Our application will store events in the database, so now let’s create a controllers and event model.
$ rails g controller dashboard index --skip-assets
$ rails g resource event name event_date:date description:text place --skip-assets
$ rake db:migrate
7. Add root path and the api namespace.
Let’s open the routes.rb under the config folder and add a few lines:
root 'dashboard#index'
namespace :api do
  resources :events
end
and remove:
get 'dashboard/index'
You can check whole routes.rb here.
8. Place Controller in proper location
Create api folder under the app/controllers and move there the events_controller.rb
9. Add the index method inside the EventsController
Let’s change our events_controller.rb to:
I added the api namespace, so we need to move it under the Api Module. In the index method, we return all records in the JSON format.
10. Change the index.html.erb in the dashboard folder.
Now let’s change the index.html.erb, remove everything from there, and add the one and only line in our views:
<%= react_component 'EventApplication' %>
This method renders our main React component, which is taken from the ‘EventApplication’ React’s class.
You can also remove the events folder under the app/views.
11. Let’s create our first component!
Create the event_application.js.jsx under the app/assets/javascript/components. JSX is the special JS format, which React uses.
It’s a class which returns a html code, and inside it, another component called EventTable. One of the most important things to remember when you create a new React component, is that a component needs to have a render method. This method must return a html code or a function which returns a html code in an one closed tag, like: <div></div> or <table></table>. In this component, we will store all other components.
12. Add the second component – EventTable
We’ve added the EventTable component to the render function in the EventApplication component. Now we need to implement it, because without it, the application will crash and receive the error: Uncaught ReferenceError: EventTable is not defined.
Please add the event_table.js.jsx file:
This component returns a simple bootstrap’s table. Your table should look like:
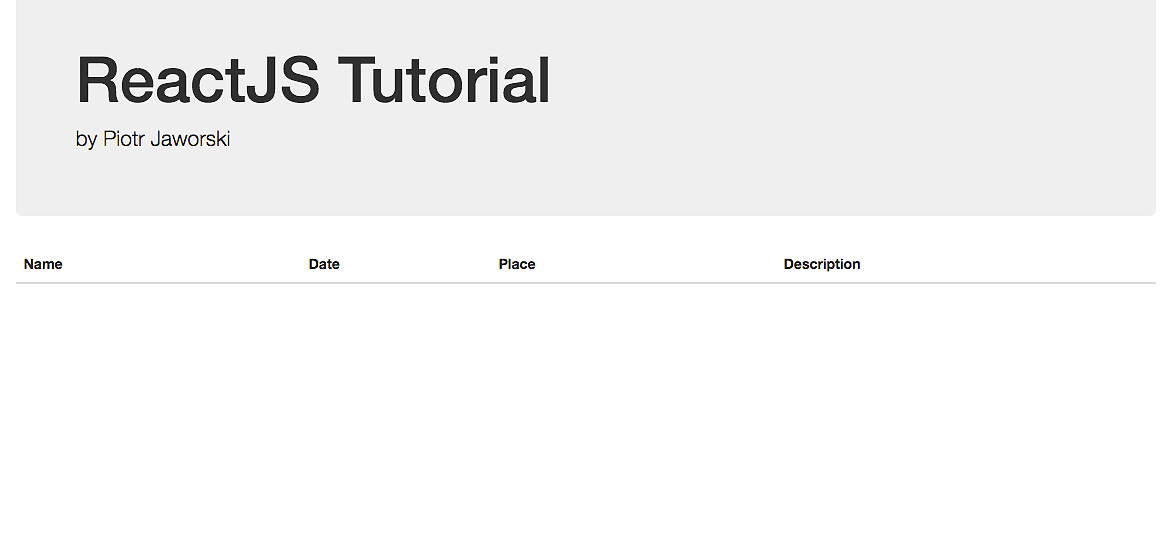
You can check it by entering the http://localhost:3000/.
13. Add the Event component
Now we need to create the event component, the class which stores all data from the database including : name, description, date, or place. It also returns a table row.
We can do this by using propTypes. PropTypes specify different types of fields, which are received from a parent. Now I should tell you something about prop. Prop is a field, which stores all data received from a parent. To pass it, you just need to add a custom field inside your component tag, like:
<Event name=”new_event”>
Now we can read data received from the props (from a parent) in this way:
this.props.name // it returns the ‘new_event’ string
So if we want to specify the type of the name prop field, we can do this:
propTypes: {
   name: React.PropTypes.string
}
To the prop, we can pass an object, an array, a variable, and even a function! It’s great, isn’t it?
14. Create seeds and run rake db:seed
Now we need to add some data to the database. To do this , we will add a seeds. Please add the code below to the seeds.rb
and after that, run:
$ rake db:seed
You can visit http://localhost:3000/api/events and check if the index action returns all events in the JSON format. We will hit this url to get data to the our table.
15. Modify the EventApplication
At this moment, we can get data from our API. We’ve created all needed components and now we need to hit our API to get all records. We can do this via AJAX. Let’s modify the EventApplication class:
We added three methods: getInitialState, componentDidMount, getDataFromApi, and modified the place, when we render the Event component (<EventTable events={this.state.events} />). By adding events={this.state.events}, we pass a props to the EventTable component in the events variable.
But what is a state? A state is a variable where components keep all variables initialized during a component initialization. When we want to use this.state.name, it must be pre-initialized. We can’t use state that hasn’t been initialized. To do this, we call the getInitialState function, which initializes all variables.
State is also very important – when we want to update our component. When data has been changed or something like this, we need to set a state variable once again. After that, a component will be re-rendered by calling the setState() function, but we will talk about it later.
I added also two other functions, componentDidMount and getDataFromApi.
componentDidMount is a function predefined by React. To its body we should pass a code, which is ran after a component is mounted in HTML. To this function, I added the getDataFromApi function, which gets data from our API, so it’s used after a component is created after a page is loaded.
If a request is successful, I set data received from API to the events state variable. Here I use the setState function, which I mentioned earlier.
As you see, after data is loaded from the server and the component is rerendered, as we run the setState method.
16. Change the EventTable class
We’ve received data from the server, but we don’t display it – yet. We need to loop through the this.props.events variable to create a single Event. To do this, let’s use forEach function and push events to the normal event variable. We are able to store there any React’s component, so we will push all events from the database using the Event component.
We also need to render them by adding the <tbody> tag to the event variable in curly brackets (to run the code).
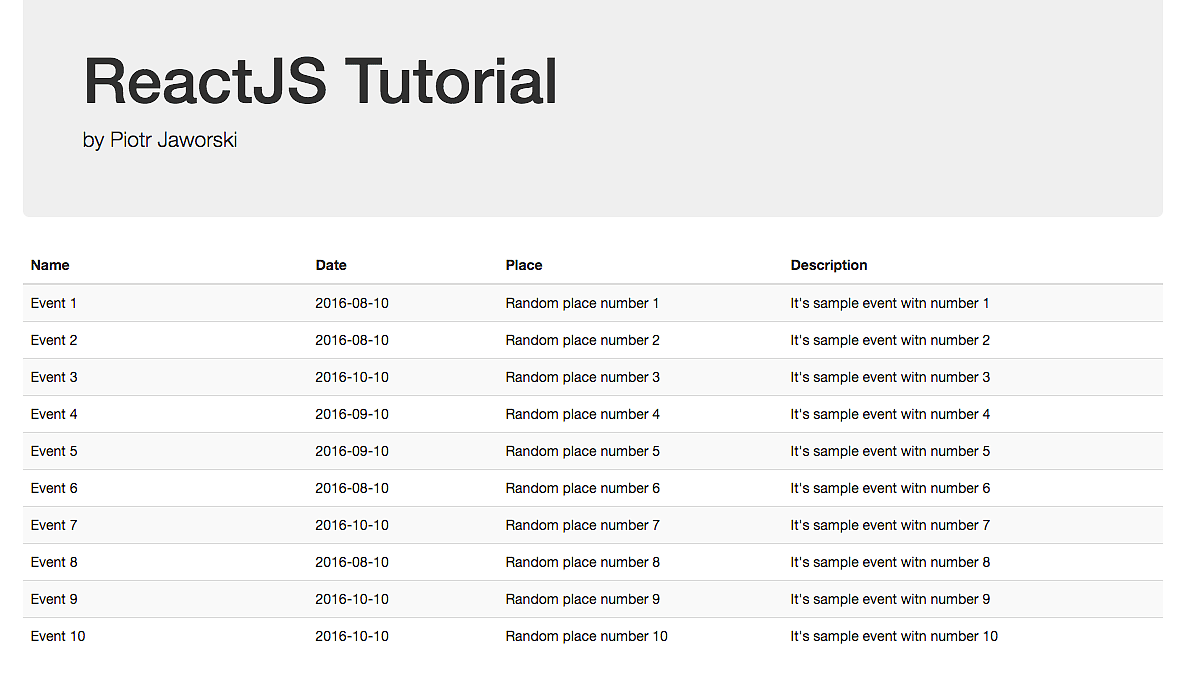
After all, your table should be filled with data, like:
17. Add the search method to the EventsController
Now we need to add a method which will search for the events. Add it to the EventsController, under the index method:
Also modify the api namespace in the routes.rb file to:
resources :events, only: [:index, :create] do
  get :search, on: :collection
end
You can test it here: http://localhost:3000/api/events/search/?query=10
18. Add the SearchForm component
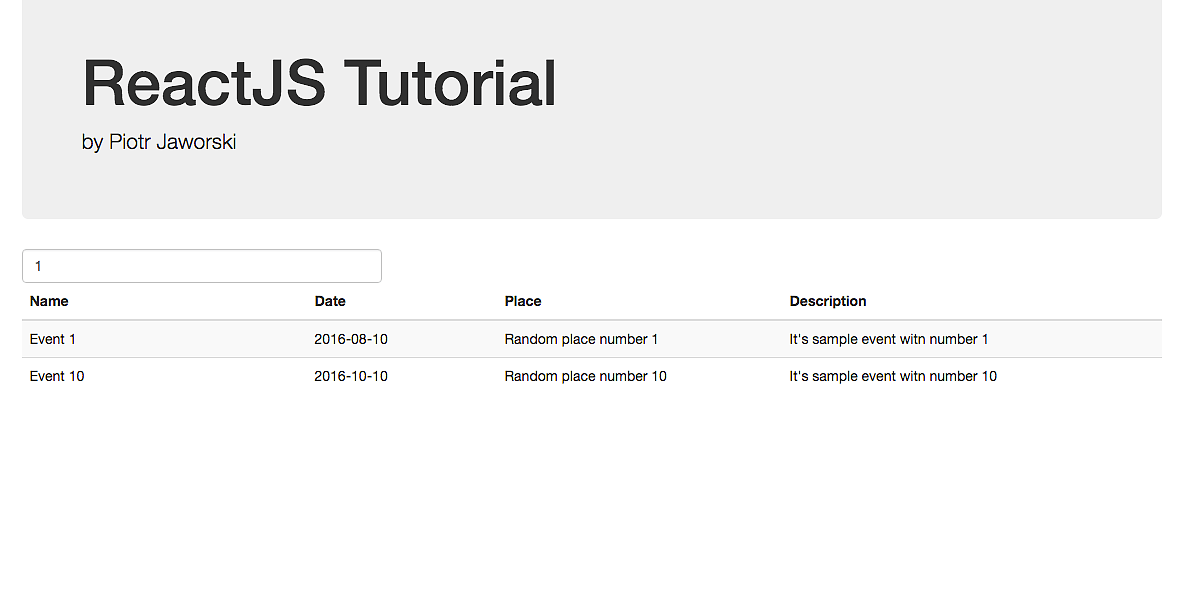
We now have the table with data from the server, but we can’t search for the events – yet. Let’s add the SearchForm component. It’s a simple form that sends a request to the server to filter events when you type inside of it. It does this by calling the handleSearch method, during any change in the search input.
We need a query value, and to get it, we’ll use the ReactDOM.findDOMNode method which searches for any HTML element with the correct ‘ref’ attribute. It’s like finding a HTML element with correct id in JavaScript: document.getElementById(‘selector’). After this, we send a normal AJAX request.
After we send a request and get a response with data from the server, we also need to update state.events in the EventApplication. This is done by calling a function handleSearch(), passed by props from the EventApplication component. Remember, we can pass via props a function.
Now we need to add handleSearch() function to the our main component (EventApplication). It sets state recieved from the SearchForm. We need also to render the SearchForm component, so I also added 5 lines (11-15).
Please type any search phrase to filter our records. You should get something similar to:
19. Add a back-end method, which handles a record adding
Now we are able to filter our records, but we still can’t to any new event. Let’s create a form which will allow us to add any record. But before that, we should implement our backend to handle it.
Add the create method to the events_controller.rb and the event_params under the search method:
20. Add the NewForm component
Okay, we prepared our back-end to handle a record adding. Now we need to add a front-end.
We need a simple HTML form and a method, which will send an AJAX request to the server.
So again, we will need to add a refs to the form’s inputs. If the inputs are not empty, we will submit the AJAX request. The request will be send by calling the handleAdd function, using onSubmit React’s function. When the request is successfully completed, we will pass data returned by server to the parent (Event application) function – handleAdd and clear input’s values.
21. Modify the EventApplication component
After adding the NewForm component, we need to modify our main component, which keeps other components inside itself – EventApplication. Let’s add handleAdd function, which will add an event returned from the NewForm to the our list using JavaScript. We also need to add a NewForm’s HTML tag to the render method inside our main component (lines 17-19).
After adding it, your application should look like:
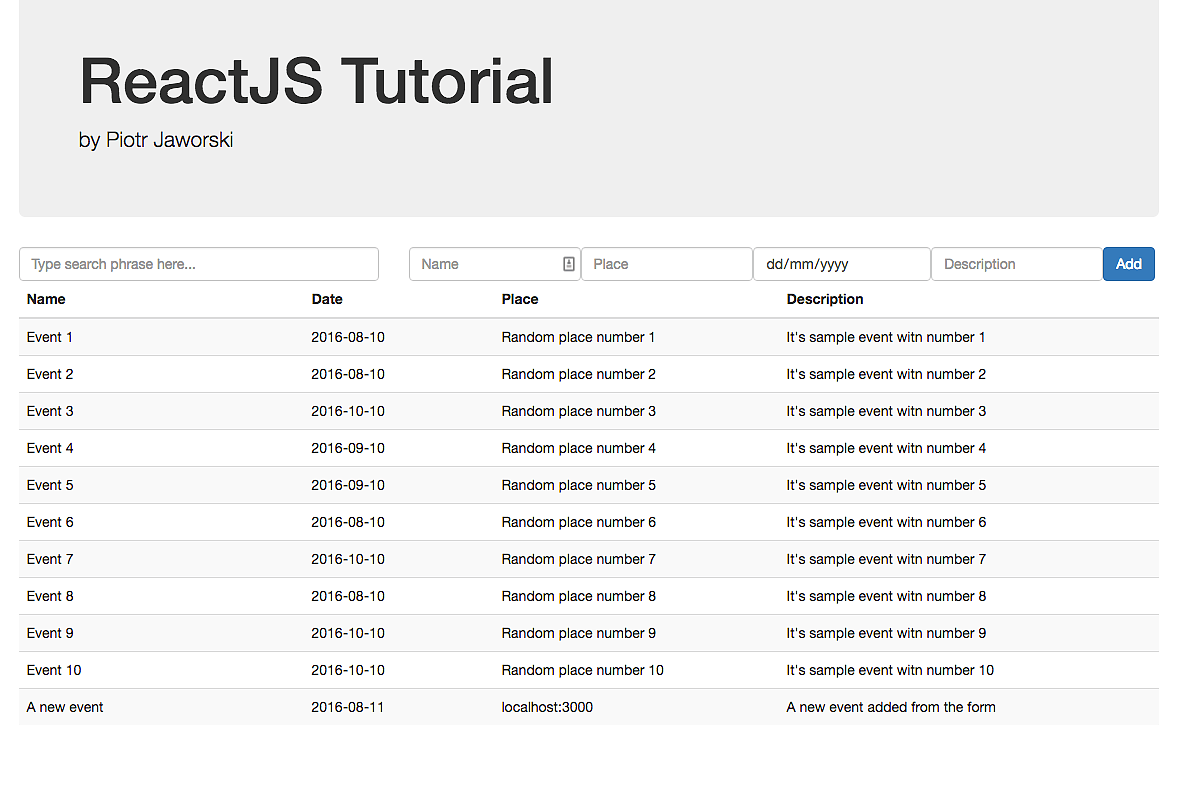
The list has been updated because we updated the state of events. After this, all components have been refreshed and updated.
Conclusion
In 21 steps, we created the application which uses ReactJS on the front-end and Rails on the back-end. In the next part of the tutorial we will add some cool features, so please continue to follow our blog in order to get this information.
I hope that you enjoyed this tutorial and found the content useful, future ReactJS developers!
You can find the source code of the application here. If you have any questions, feel free to contact with us!
If you need more resources to learn React, check official React’s docs.