
As you've probably guessed by the title of my article, I still consider Ruby on Rails as a relevant technology that offers a lot of value, especially when combined with ReactJS as it's frontend counterpart. Here's how I approach the topic.
Introduction
Single-Sign-On is a hot topic right now. Several applications such as Google, Facebook, and Github use it. Probably you’ve noticed on some pages a “Sign in with Google” or “Login with Facebook” button which enables a user to log in to a page without creating a new account.
Once you click on the button, you are redirected to the application. This is referred to SSO; it’s a system which enables access to different pages/application using just one account, so you don’t need to care about multiple passwords and accounts.
There is a long list of available implementations of SSO systems. Log in with a button is not the only way to implement it. Wikipedia says that there are over 40 different implementations of SSO systems – and Wikipedia, of course, doesn’t include them all.
One problem of some SSO implementations is the logout process. You can easily log in but these services should be notified, that you have been logged out from one service and therefore, you should be logged out from all other services. Sometimes it’s hard to achieve it. In this article, I want to show you how to implement SSO using the CAS server (Central Authentication Service) with working Single-Sign-Out system.
Trust me; it would be effortless, you don’t need to have in depth knowledge of SSO systems. I’ll show everything step by step. All that you need to know is basic Ruby/Rails knowledge.
Application description
We’ll build two applications using Rails 4.2.0. One will be the CAS server and another one a client application, which will connect with the CAS server to authenticate a user.
When you log out from one application, automatically you’ll be logged out from all other applications. In the client application, you can decide how the access would be granted. Also, there will be an option to enable a Two-Factor-Authentication using QR codes.
Let’s start!
Let’s start by creating a fresh Rails 4.2.0 application. It’s imperative to use version 4.2.0 – CASino gem currently supports Rails up to version 4.2.0. There is one PR which supports Rails 5.0+ and is waiting for approval but it’s not merged yet.
Just keep in mind, that all other applications, can use any other Rails version, so only our CAS server will use 4.2.0.
If you don’t have Rails 4.2.0 installed, you can do it by using ruby gems:
$ gem install rails -v ‘4.2.0’
Also, please also install Ruby 2.3.4 or lower, cause I’ll use this version in this tutorial.
$ rvm install 2.3.4
Now we can create Rails 4.2.0 app with PostgreSQL database:
$ rails _4.2.0_ new casino_app --database=postgresql
If you have any problems with Nokogiri gem during bundle install process, please visit this page. It’s the official Nokogiri support page, which shows how to install this gem properly.
Let’s start from cleaning your Gemfile, keep only needed gems
source 'https://rubygems.org'

gem 'rails', '4.2.0'
gem 'pg', '~> 0.18'
gem 'sass-rails', '~> 5.0'
gem 'uglifier', '>= 1.3.0'
gem 'jquery-rails'
gem 'turbolinks'
gem 'jbuilder', '~> 2.0'
gem 'sdoc', '~> 0.4.0', group: :doc

group :development, :test do
  gem 'pry-rails'
  gem 'spring'
end
CASino gem
Ok, Gemfile is ready, so finally we can add CASino gem. Add this line to your Gemfile:
gem ‘casino’
Now bundle everything:
$ bundle install
After your bundle command is finished, you need to run CASino installer which generates all needed files and add a few modifications to routes and migrations:
$ rails g casino: install
As you can see, CASino added a few migrations, now we need to run them ,but before it, we need to create a database:
$ rake db:create
$ rake db:migrate
Another importing file which has been added by CASino is cas.yml file. In this file, we keep whole CAS server configuration.
Now, you’re ready to run a Rails server. Please bind it to 3000 port and visit the main page of the app:
$ rails server -p3000
$ open localhost:3000
You should be able to see the CASino login form. When you visit the cas.yml, you can see that currently, we use a static authenticator. What does it mean? It means that you can log in using hardcoded credentials which are in the cas.yml file, so in our case the username would be testuser and the password is foobar123.
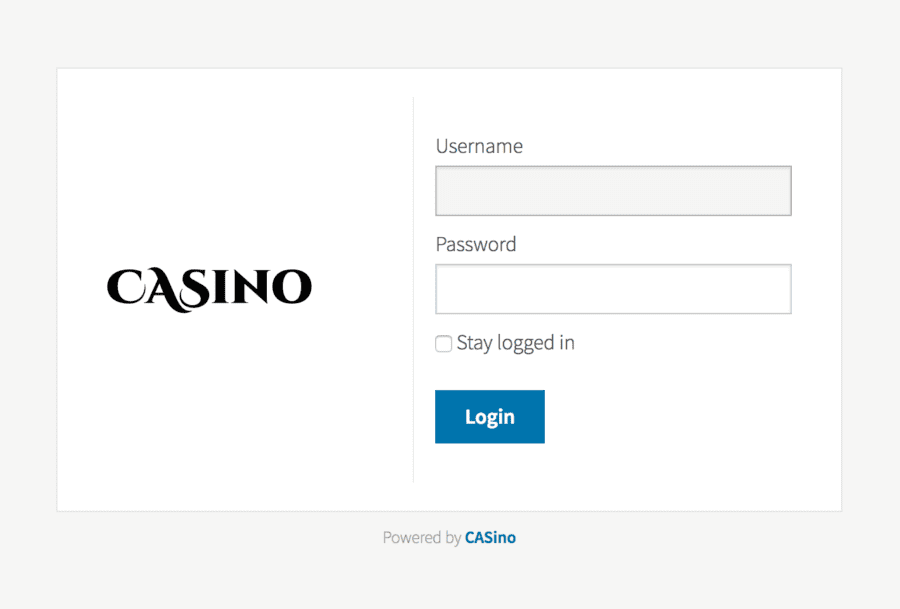
Yeah, let’s fill the form with this credentials! Boom, it’s working! You’ve just logged to the CASino dashboard. You should be able to view the main CASino page:
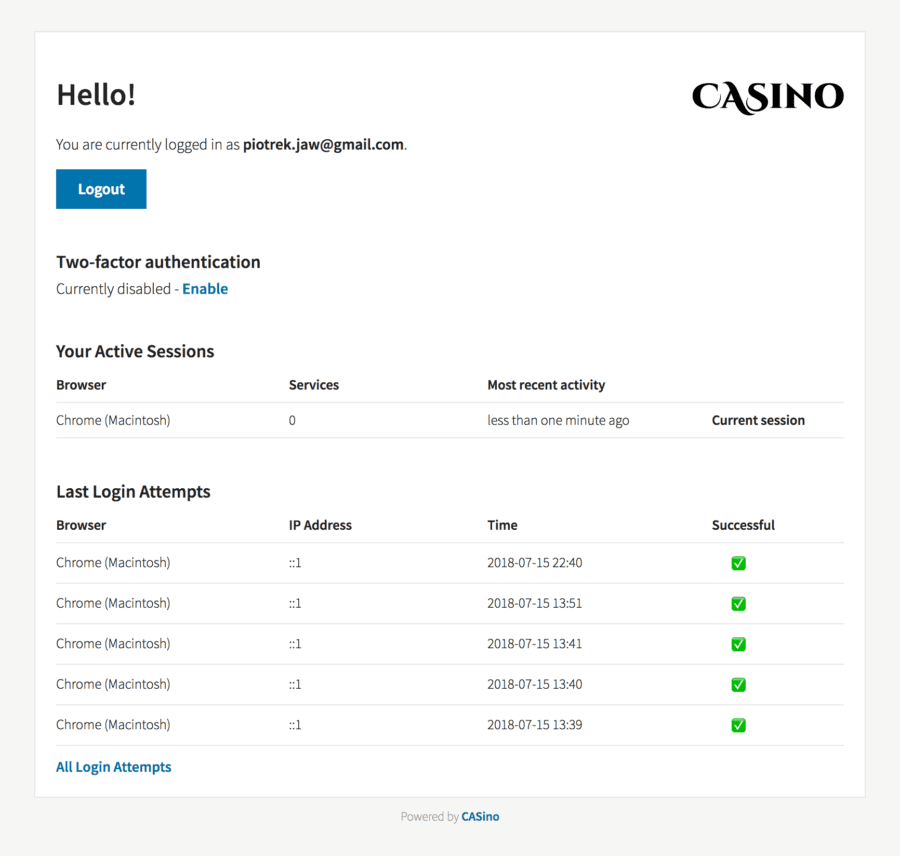
There is almost everything, your last login attempts, all active sessions, logout button and the possibility to enable two-factor authentication.
Two-factor authentication
One thing remains. If you want to enable 2FA, you need to do a small change in your cas.yml file;you need to add these lines before the defaults section:
two_factor_authenticator:
 enabled: true
 lifetime_inactive: 300
 drift: 30
Now, when you restart your Rails server, you can enable 2FA by clicking the activate button. After clicking on it, you should see a QR code. You can scan it and add to the Google Authenticator app.
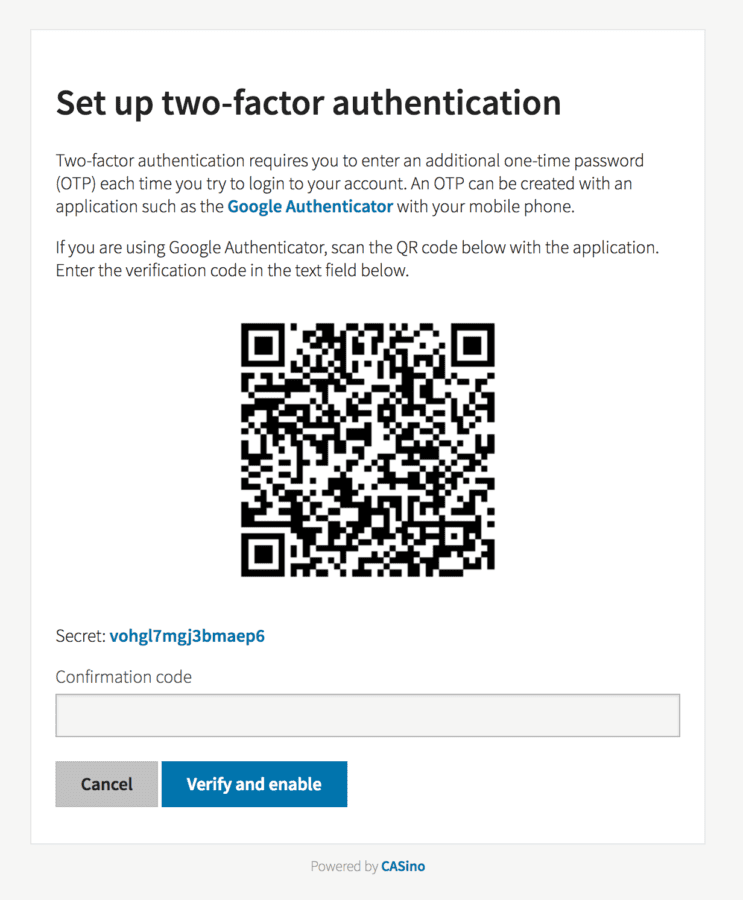
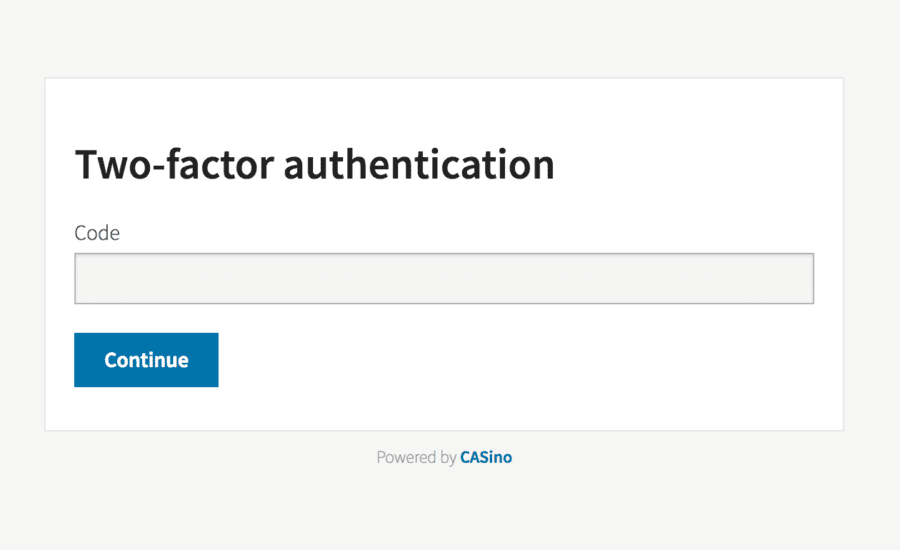
From now, each time when you’ll try to login, you will need to provide also your 2FA code.
Excellent, your CAS server is ready. Now we want to add another application which will use the CAS server as SSO. There is one problem – currently we support only one hardcoded credentials, and it’s the only way to get to our application.
We must change it and use real data. The best idea could be connecting to a different database and read/keep all credentials from it.
Authentication based on a database
Let’s create a new database with a users table. We’ll store them as a user’s email and hashed password. To do it, please run psql command line.
$ psql

> CREATE DATABASE casino_users;
> c casino_users
We’ve just created a new database and connected to it. Now we need to create a users table and add pgcrypto extension, which will be responsible for hashing our passwords.
> CREATE EXTENSION pgcrypto;
> CREATE TABLE users (email varchar(100), password varchar(128));
> INSERT INTO users VALUES ('[email protected]', CRYPT('pass1234', GEN_SALT('md5')));
> SELECT * FROM users;
email | password
———————–+————————————
[email protected] | $1$UHzTL2FD$brerm/U93r80PmMGcVyMU1
Everything seems to be working, a new user has been created, and the password is encrypted. We’re on the right path!
Now we need to remove our static authenticator and connect our database to CASino. We can do it by adding ActiveRecord authenticator! There is a ready-made solution, which is effortless to implement. Let’s start by adding a casino-activerecord_authenticator gem to our Gemfile:
gem 'casino-activerecord_authenticator'
Now run bundler add add the following lines to your cas.yml config file, basically remove the static authenticator and add the following lines:
development:
<<: *defaults
authenticators:
psql:
  class: "CASino::ActiveRecordAuthenticator"
    options:
      connection:
        adapter: "postgresql"
        host: "localhost"
        username: ""
        password: ""
        database: "casino_users"
        table: "users"
        username_column: "email"
        password_column: "password"
I’m assuming that your database is on your localhost, it’s called casino_users, and you keep everything in the users’ table under email and password columns. Now your cas.yml file should look like:
defaults: &defaults
  login_ticket:
    lifetime: 600
  ticket_granting_ticket:
    lifetime: 300
    lifetime_long_term: 86400
  service_ticket:
    lifetime_unconsumed: 300
    lifetime_consumed: 86400
  proxy_ticket:
    lifetime_unconsumed: 300
    lifetime_consumed: 86400
  frontend:
    sso_name: "CASino"
    footer_text: "Powered by <a href="http://rbcas.com/">CASino</a>"
  two_factor_authenticator:
    enabled: true
    lifetime_inactive: 300
    drift: 30

development:
  <<: *defaults
  authenticators:
    psql:
      class: "CASino::ActiveRecordAuthenticator"
      options:
        connection:
          adapter: "postgresql"
          host: "localhost"
          username: ""
          password: ""
          database: "casino_users"
          table: "users"
          username_column: "email"
          password_column: "password"

test:
  <<: *defaults
  authenticators:
    static:
      class: "CASino::StaticAuthenticator"
      options:
        users:
          testuser:
            password: "foobar123"
There is one remarkable thing about CASino – it supports Unix crypt style stored passwords, so salted MD5, salted SHA256 and SHA512, as well as the recommended bcrypt algorithm. So you don’t need to care about the decryption, it’ll handle for you!
Go again to http://localhost:3000 and try with the newly created credentials. You should now be logged correctly. It’s really working!
Connecting another application
Now we want to connect another application to our CAS server to use SSO. Let’s create it from scratch.
$ rails _4.2.0_ new casino_todo_app --database=postgresql
Create a database and run this application on a different port, for instance on 3001:
$ rake db:create
$ rails server -p 3001
Let’s also clean our Gemfile from not needed gems:
source 'https://rubygems.org'

gem 'rails', '4.2.0'
gem 'pg', '~> 0.18'
gem 'sass-rails', '~> 5.0'
gem 'uglifier', '>= 1.3.0'
gem 'jquery-rails'
gem 'turbolinks'
gem 'jbuilder', '~> 2.0'
gem 'sdoc', '~> 0.4.0', group: :doc

group :development, :test do
  gem 'pry-rails'
  gem 'spring'
end
I won’t create here something special, let’s assume that our home page will be a dashboard, to which you want to authenticate a user or even something more complicated! Please generate a HomeController with the index action:
$ rails g controller home index
Change routes and set our root_path:
root 'home#index'
Ok, everything is ready. What we’ll do now is to add a rack-cas gem. This gem will handle for us all redirections to CAS server – basically the client integration. What is more important, you can even have a C#, PHP, Java or Apache client. Here is a list of supported libraries for different languages. Let’s add it:
gem 'rack-cas'
Now install it:
$ bundle install
Great, gem is added, now we need to run migrations which will create cas session table. In this table we’ll store all sessions:
$ rails generate cas_session_store_migration
$ rake db:migrate
There are two more things. To configure the client side, we need to override sessions_store.rb with:
require 'rack-cas/session_store/rails/active_record'
Rails.application.config.session_store ActionDispatch::Session::RackCasActiveRecordStore
And add to application.rb these following lines:
...

require 'rack-cas/session_store/active_record'

...

  config.rack_cas.server_url = 'http://localhost:3000'
  config.rack_cas.session_store = RackCAS::ActiveRecordStore

...
Basically, we instruct our Rails application that our sessions will be managed by RackCAS gem and point to the address of CAS server.
Let’s generate user model. You may ask, for what do we need this model? Well, we need to authenticate a user somehow, if he has access to our application. As you probably noticed, an email address would be our identifier. If a user visits our application without being in a database, it means that he doesn’t’ have access to it.
$ rails g model user email
$ rake db:migrate
Now we need to add some code to our application controller. How does RackCAS deal with authentication? Well, everything that we need to do, to return 401 HTTP status code, then we’ll be redirected to our CAS server, and we’ll need to login. Then, we’ll be redirected back to our application.
class ApplicationController < ActionController::Base
  protect_from_forgery with: :exception

  helper_method :current_user, :cas_user

  before_action :cas_authentication!

  def current_user
    cas_user && User.find_by(email: cas_user)
  end

  private

  def cas_authentication!
    render status: 401 unless cas_user
  end

  def cas_user
    session["cas"] && session["cas"]["user"]
  end
end
So before each request, we should check if a user is logged. Based on data from session[“cas”][“user”], we’re able to get user’s data and his email address. Thanks to that, we can make a query and search for him in our database. If there is the user in the database with this email address, it means that we should authenticate him.
Current_user keeps a User record, while cas_user keeps a data returned by the CAS server.
Now let’s add some HTML code into application.html.erb. We need to show the logout button and the information if a user is authenticated or not:
<!DOCTYPE html>
<html>
<head>
  <title>CasinoTodoApp</title>
  <%= stylesheet_link_tag    'application', media: 'all', 'data-turbolinks-track' => true %>
  <%= javascript_include_tag 'application', 'data-turbolinks-track' => true %>
  <%= csrf_meta_tags %>
</head>
<body>

<% if cas_user %>
  <%= link_to 'Log out', sso_sign_out_url %>
<% end %>

<% if current_user %>
  <h1>Welcome, <%= current_user.email %>!</h1>
<% else %>
  <h1>You don't have access to this application!</h1>
<% end %>

<%= yield %>

</body>
</html>
When you visit the http://localhost:3001 page, you should be redirected back to the CAS login form. Look at the URL http://localhost:3000/login?service=http%3A%2F%2Flocalhost%3A3001%2F, it tells that we have been redirected from our localhost:3001 application.
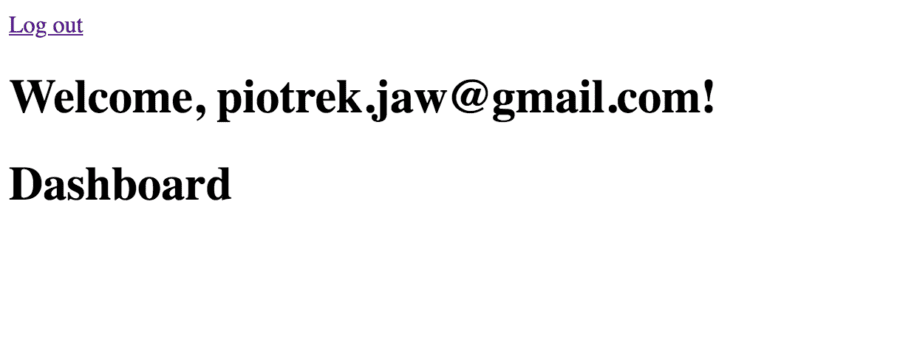
After you sign in, you should be able to access the dashboard and view:
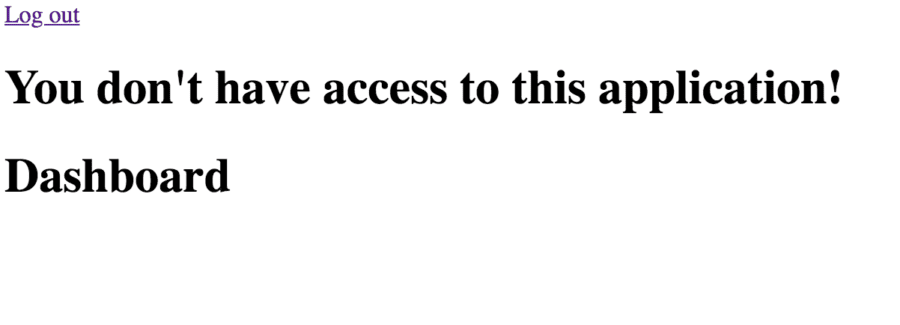
If you don’t have an access to the application (if you didn’t create a user with this email address), you should see something like:
When you click on the Logout button, you will be signed out from all of the applications! So we have also implemented a Single-Sign-Out feature too!
Cleanups
Now let’s add last cleanups to our application. We need to move the same variables into environment variables. Please add dotenv to Gemfile, just after rails:
gem 'dotenv-rails'
Dotenv gem allow to keep environment variables inside the .env files. You can have a separate variables for each environment, for development (.env.development) or for test (.env.test) or the global one (.env).
Please create a .env file with the following context:
CAS_SERVER_URL="http://localhost:3000"
Also, we should format somehow the logout URL. Let’s move this code into the application helper:
module ApplicationHelper
  def sso_sign_out_url
    ENV['CAS_SERVER_URL'] + '/logout'
  end
end
Now you need to update the application.html.erb file and change the existing link to the helper method:
...

<% if cas_user %>
  <%= link_to 'Log out', 'http://localhost:3000/logout' %>
  <%= link_to 'Log out', sso_sign_out_url %>
<% end %>

...
Finally, update the URL of the CAS server in the application.rb file:
config.rack_cas.server_url = ENV['CAS_SERVER_URL']
Now restart the server, everything show works as before!
Yeah, you did it, you implemented a working SSO integration using CAS server in a few, easy steps, congratulations!