
As you've probably guessed by the title of my article, I still consider Ruby on Rails as a relevant technology that offers a lot of value, especially when combined with ReactJS as it's frontend counterpart. Here's how I approach the topic.
We’re going to build an app to manage breakfast recipes. We won’t focus on developing all CRUD functionality, because it’s not in our scope. Instead, we’re going to focus on four main steps:
- Create a simple API for recipes. We’re going to talk about serialization a little bit.
- Add Bulma to make our app look good.
- Consume API from React components. We’re going to use axios library to make requests to the backend and create React component from scratch. Additionally, you’ll see the render prop pattern in action.
- Upload files. We’re diving into Active Storage feature and react-dropzone-component library.
The app we’re going to create looks something like this:

If you want to skip ahead to the finished repo, you can do so here.
Prerequisites
Before we begin, make sure you have ruby version >= 2.5.0 and Rails version 5.2.0. The ActiveStorage gem is included on Rails 5.2 by default. You can simply check your version:
ruby -v # ruby 2.5.0
rails -v # Rails 5.2.0
[ If your ruby version is not up to date, you can update it with a ruby version manager like rvm or rbenv. ] You can find how to integrate Rails app with React in our previous articles here (with webpacker gem) and here (with create-react-app tool). There are a bunch of interesting articles on the Internet that you can help you do it so feel free to choose the best for you.
Step 1: Create a simple API to update recipes
The reason for this tutorial is to demonstrate how to use Active Storage together with a React library so we won’t spend time building full CRUD. Let’s generate Recipe model.
rails g model Recipe title:string description:string instruction:string
and populate db/seeds.rb. To save time, you can use these recipes examples. Then run:
rails db:create db:migrate db:seed
The command respectively creates our DB, executes migrations and populates tables with data.
API Endpoints
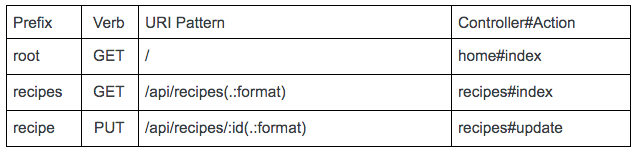
Once we finished with modeling, now it’s time to take care of API endpoints. In our routes, we’ll need to hook up the recipes resource. We’ll focus only on listing recipes and updating a single recipe. So add these lines to config/routes.rb: [ scope :api changes the resources path and adds /api prefix before /recipes. It helps to differ what are API paths. Here is a nice article what you can do with scope. ] Our API will expose the following RESTful endpoints: We still need to create methods for these routes; so let’s do it. Create recipes controller app/controllers/recipes_controller.rb, and add the following in the file: Next up, restart your server, and you should be able to visit http://localhost:3000/api/recipes to see the recipes we’d populated in db/seeds.rb:
Serialization
Even though Rails provides JSON serialization by default, we’re going to use ActiveModel::Serializer, because in a real application the framework feature is usually not enough. ActiveModel::Serializer encapsulates the JSON serialization of object. It allows defining attributes and relationships which should be included in a JSON response. It also acts as a presenter, so you can define custom methods to override how object properties are displayed or show additional information about an object. Add the following gem to your application’s Gemfile:
gem ‘active_model_serializers’
And run bundle to install this gem:
bundle install
Once we have the gem installed, we can generate the Recipe serializer:
rails g serializer Recipe
The generator will create a new serializer inside app/serializers/ folder. Fill the file with the following: attributes defines what should be included in a JSON response. Moreover, we override updated_at to have nicely formatted output. If you make a request again to http://localhost:3000/api/recipes, you should get a serialized response:
Step 2: Add Bulma to make our app looks good
Bulma is an open source CSS framework based on Flexbox. To make it work, just run the command in your console:
yarn add bulma
or
npm install bulma
After installation, you can import the CSS file into the project using this snippet inside packs/application.js:
import 'bulma/css/bulma.css';
Now we can start building our React components!
Step 3: Consume API from React components
First create App.jsx file under app/javascript/packs. It’s going to be our parent component. Fill the file with the following: Now we have to tell React where inside the DOM tree the App component should be rendered. Jump into packs/application.js. Our App component will be rendered inside div element with ‘root’ id. Make sure your rails server and web pack are running. When you hit localhost, you should see “Hello there”. Now it would be nice to display our recipes right? For now, we’re going to mock recipes data. Change the App component to look like: We present the mocked data as key pair value objects. The reason is to have the ability to look for recipes while updating easily. As we have plenty of recipes, we need to iterate over them. We’ll put this logic to RecipeList component: Our main issue is to separate concerns of displaying and editing a recipe. To achieve this, first create a NonEditableRecipe functional component that will be responsible only for displaying information about a single recipe. React allows creating reusable components so we can use NonEditableRecipe component and display it in every iteration passing single recipe as props. Now NonEditableRecipe has access to recipe property taken from its parent component. As you can see we use bulma styles and a sample image. After these steps, you should get something similar to: 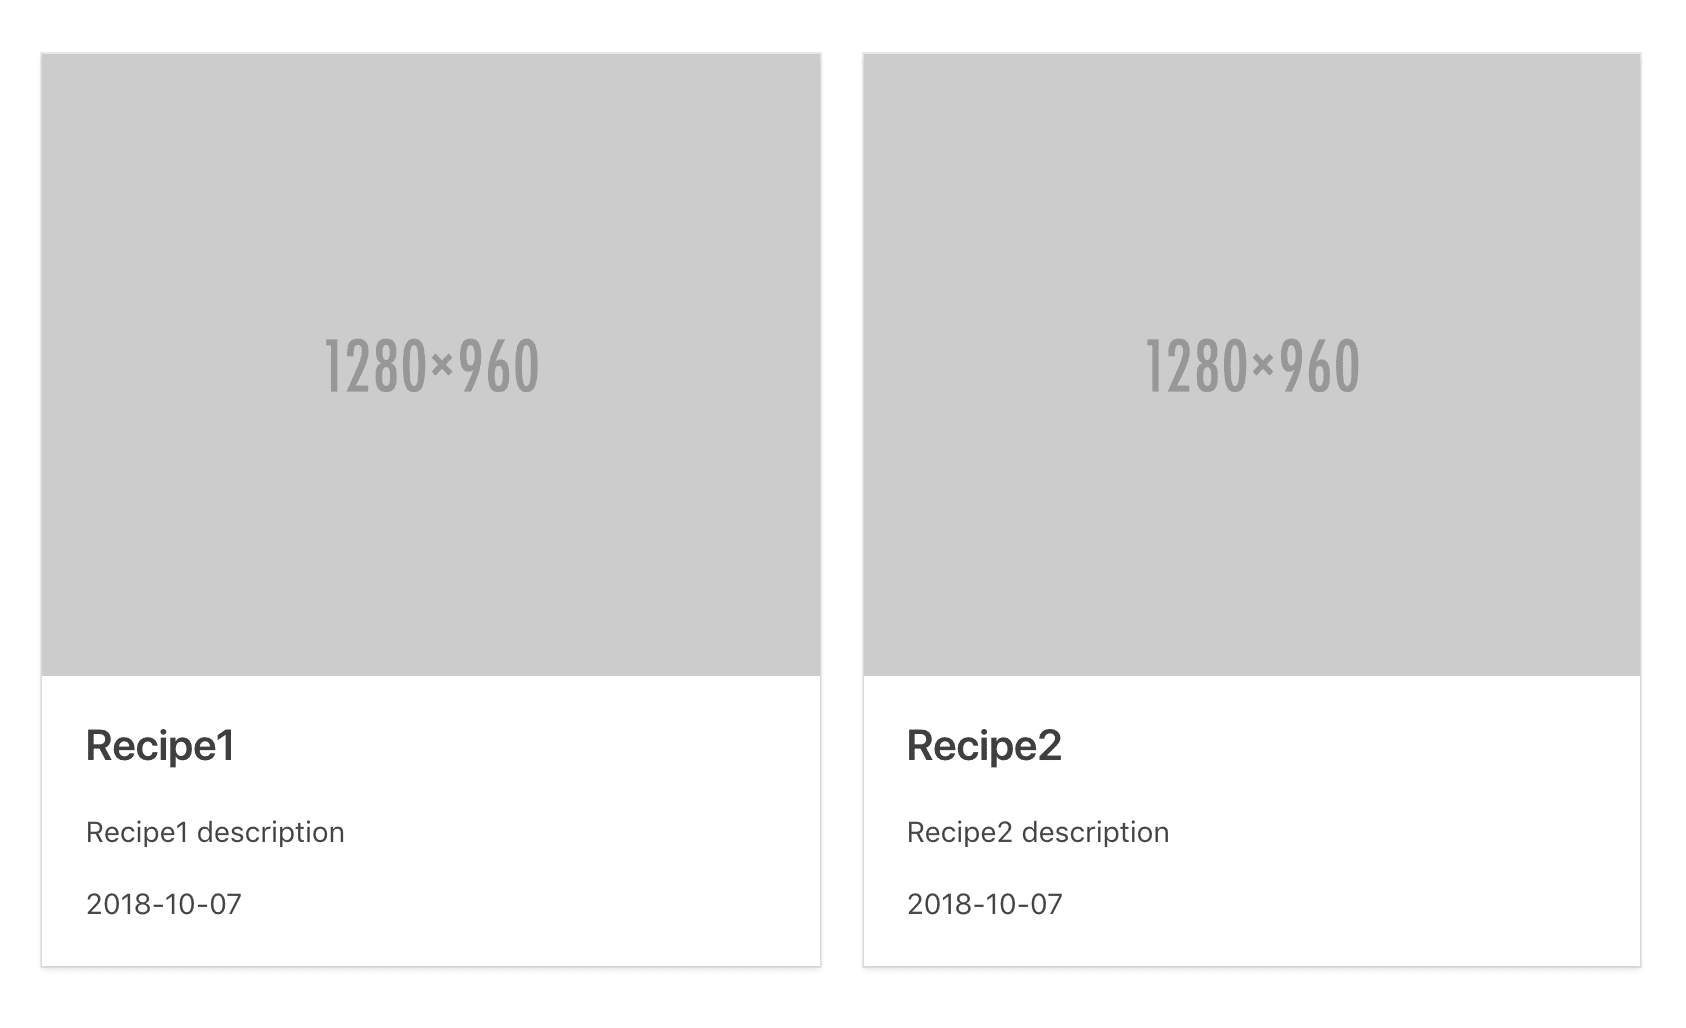 Then we need to take care of updating recipes. Create EditableRecipe component. It contains a form that you can fill in to set a recipe’s properties and several methods: handleInputChange()– called every time a form input changed and sync local state with new values.
handleSubmit() – for now simply logs a text, later should submit a form.
To connect both recipes functionalities, we’re going to introduce Recipe component which returns EditableRecipe or NonEditableRecipe component based on the state given from its parent (RecipeToogle component). This approach is called render prop pattern. The idea behind it is that RecipeToogle is only responsible for managing isEditable state that is passed down to its children together with toogle() method. It gives us a nice separation of concerns and loose coupling. We also have to add a button for toggling between EditableRecipe and NonEditableRecipe components. Don’t forget to change RecipeList to display Recipe component rather than NonEditableRecipe. Toggle functionality is ready! 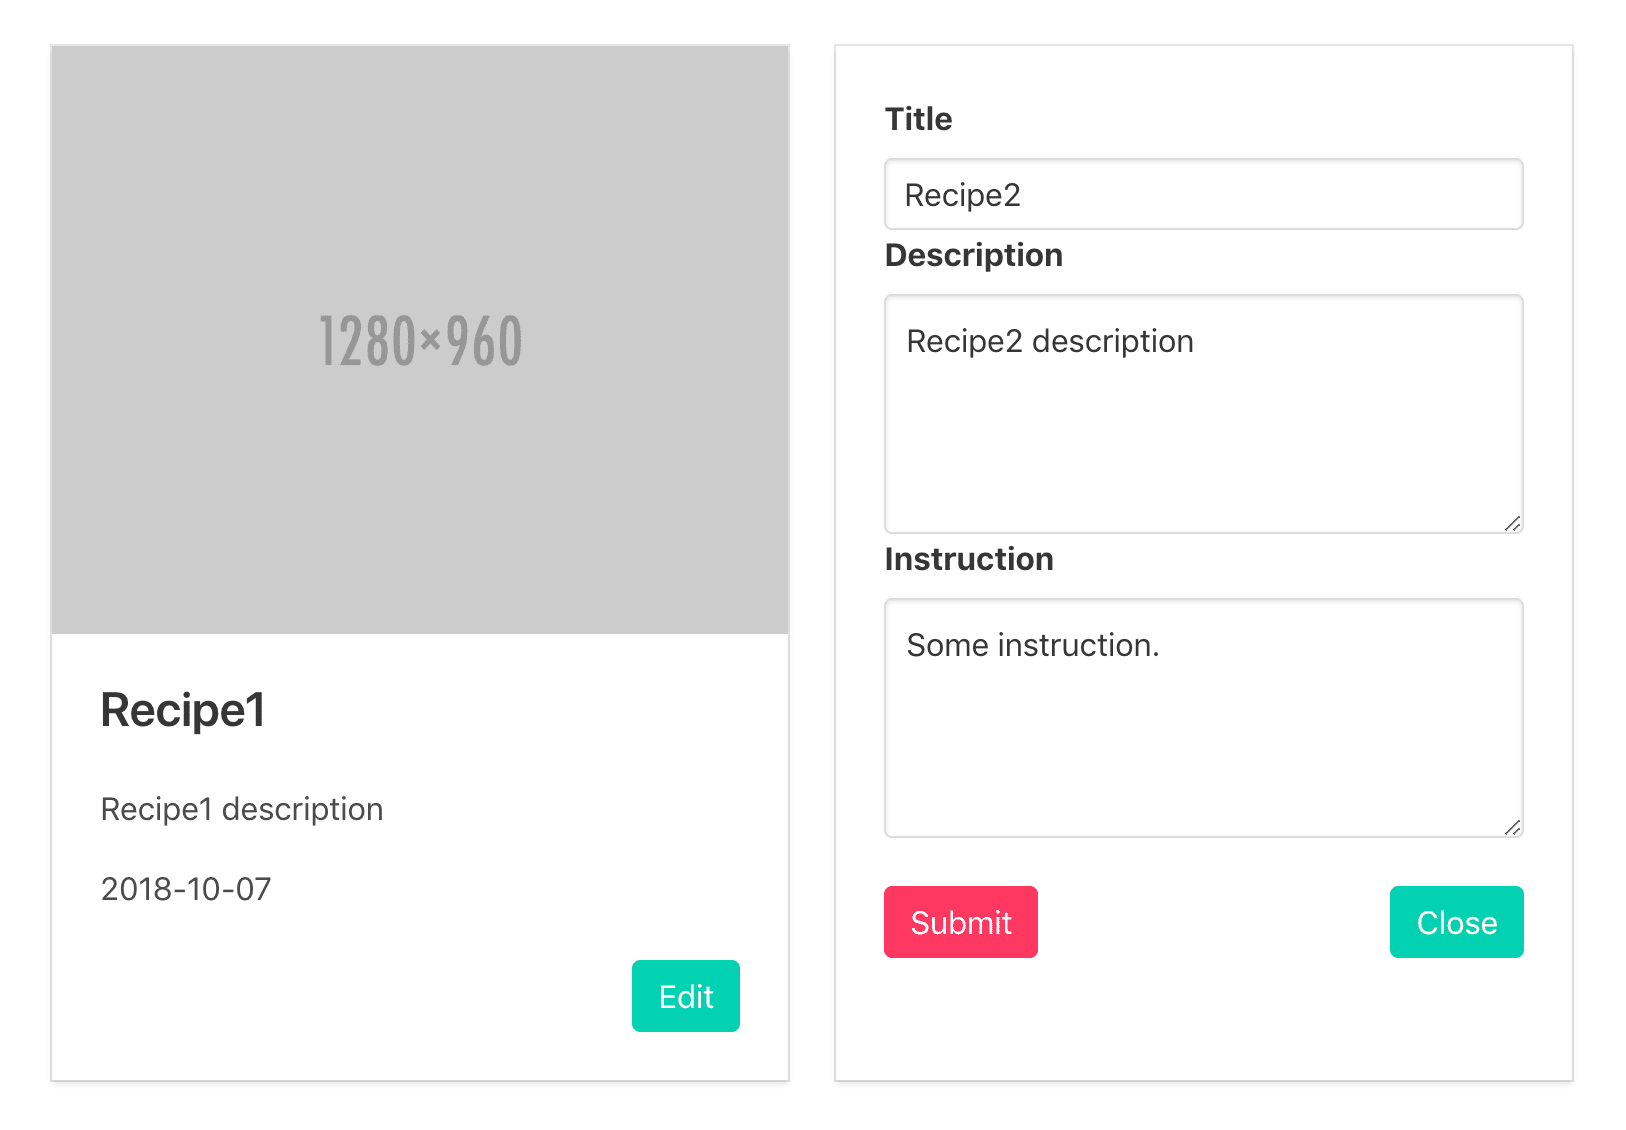 Next, we want to allow our React component to talk with Rails API. To make it easier let’s install axios – promise based HTTP client to make requests from the browser.
yarn add axios
Create recipeApi.js file under app/javascript/packs/api/ folder and fill with the following: We will need two methods:
getRecipes() – to fetch all recipes,
updateRecipe(formData, recipeId) – to update a single recipe with data from the form.
Since App is our main parent component, it’s a good place to communicate with exposed endpoints and treat it as a container. fetchRecipes() – loads recipes from the backend and assign to the component state, invoked inside lifecycle React component method componentDidMount().
mapIntoObject() – helper method to map array elements into key pair value objects.
update() – sends recipes data getting from the form to the backend to be saved and updates internal component state with updated recipe; we need to call a callback() that will be toogle() method in our case, because we want to display NonEditableRecipe component just after a recipe is updated.
Pass down update() method from App component through RecipeList to Recipe and then to RecipeToogle component. Add submit() method inside RecipeToogle and use update() method. Make the submit() method available for RecipeToogle children. Now EditableRecipe component should have access to it as well. Back to EditableRecipe component, let’s update handleSubmit() method to collect recipe form data and send to the submit() that you can get from the props. We have quite a lot of work behind us. I’m glad that you’ve gotten this far. :). You should be able to update recipes now. Check it out and let’s move to the next step: Uploading images.
Step 4: Upload files
Active storage
Our next goal is to upload images for recipes. Time to see Active Storage in action. It’s a built-in solution for handling file uploads for Rails 5.2. It’s similar to popular third party gems such as Paperclip or Carrierwave. To start with Active Storage, run the command:
rails active_storage:install
The command creates the migration to add active storages two tables to your application: blobs and attachments. This migration looks like this: Here are their responsibilities, according to Rails README:
Active Storage uses polymorphic associations via the Attachment join model, which then connects to the actual Blob. Blob models store attachment metadata (filename, content-type, etc.), and their identifier key in the storage service.
So the blobs are going to store all the file-related metadata like the file name, file size, content type, etc. The attachments is the join table between your models and your uploads. What it means is that you don’t need to make any databases changes, no additional migrations needed, whenever you want to add a new upload to your models. This nifty approach distinguish Active Storage from its competitors such as Paperclip or Carrierwave which on the contrary require to add a new column to the existing model. With Active Storage you can keep your data on local hard drive as well as public cloud providers. Most popular cloud providers Amazon S3, Google Cloud Storage and Azure Blob Storage are supported out of the box. Let’s attach a single image to our recipe. Go to Recipe model and add:
Let’s test if we can add image to our existing recipe. Download an example image, find a recipe in the console and try to attach downloaded image:
recipe.image.attach io: File.open("/file/to/path"), filename: "image.jpg", content_type: "image/jpg"Then check if the image is attached correctly:
recipe.image.attached?
To delete image use:
recipe.image.purge
Now, we need to update recipes_controller.rb. Add :image parameter to the white-list. Use with_attached_image method delivered by Active Storage inside index controller method to prevent N+1 while getting recipes with their images. Change update controller method to look like: We’re going to move business logic for updating a recipe to the separate service. Create UpdateRecipeService class under app/services/ folder: To get a recipe image included in JSON result, we have to set it up in RecipeSerializer. image – returns formatted object if an image is attached to a recipe. The object includes image information such as file name, byte size, and URL to image source.
url_for – helper method that gives a source path to a given image.
You have to include Rails.application.routes.url_helpers to get access to the url_for method.
[ If you get an error: ArgumentError (Missing host to link to! Please provide the :host parameter, set default_url_options[:host], or set :only_path to true)you probably don’t have correct environments configurations. Add these two lines with your host: config.action_mailer.default_url_options = { host: ‘localhost:3000’ } Rails.application.routes.default_url_options[:host] = ‘localhost:3000’ to every config/{environment}.rb file ]
React Dropzone Component
Once we complete the backend side, we can take care of the frontend. First we need to install the react-dropzone-component library:
yarn add react-dropzone-component
It provides a React Dropzone Component which allows drag and drop files uploads with image previews. The component is based on an open source Dropzone.js library. We’re going to start from EditableRecipe component. It will keep track of the selected image and attaches the image to a recipe form while submitting. Let’s add selectedImage field to the component state and initialize with null. Update handleSubmit() method to append an image to a recipe form when the image is selected. Add two methods: selectImage() and unselectImage() which are going to deal with updating selectedImage state. We will invoke selectImage() method every time when we drag and drop a file inside an upload area. There will be also a possibility to remove image completely; so we’re going to set selectedImage value as an empty string to send it later to backend and delete from our database. The last thing we’re going to change in this component is render() method to display drag and drop area for uploading files. To make this functionality reusable we’ll create ImageUploader component that will use underneath react-dropzone-component library. Let’s place ImageUploader under app/javascript/packs/components/shared/ folder and fill with the following:
Dropzone Component Configuration
DropzoneComponent has defined customizable configuration:
componentConfig – required configuration object which the DropzoneComponent is initialized with, eq. you can enable to show file types icons or prevent posting files automatically to a URL by filling postUrl with meaningless string and set autoProcessQueue to false inside djsConfig object.
djsConfig – optional configuration object for dropzone.js, eq. you can restrict file types you are allowed to upload or enable the remove button.
eventHandlers – optional list of event handlers;
we use three of available events:
init() – the callback receives a reference to the dropzone object as a parameter; dropzone operations require accessing the dropzone object so it’s a good place to assign dropzone object to a variable that you will have access to (in our case we assign dropzone object to an instance variable myDropzone). As the name says init() is called when a component is initialized so you can call your methods there that should be invoked first. We want to display a thumbnail if an image was already uploaded. This is what showPreview()method is doing. The image is taken from the parent component.
addedfile() – is invoked right after selecting image to be uploaded; the image is automatically added to the files array belonging to the dropzone object (you can access it with this.myDropzone.files). We want to allow upload of only one image for a single recipe. In the event of a callback, we invoke additional removePrevAndAddNew() method that removes previous image if it was already selected and call parent selectImage() method with given new selected imate to update the parent state.
removedfile() – is invoked after clicking the remove button. In the callback we invoke the parent unselectImage() to set parent state for selectedImage to empty string. That’s all! Now try to upload an image. If everything works correctly, you should get something similar to: 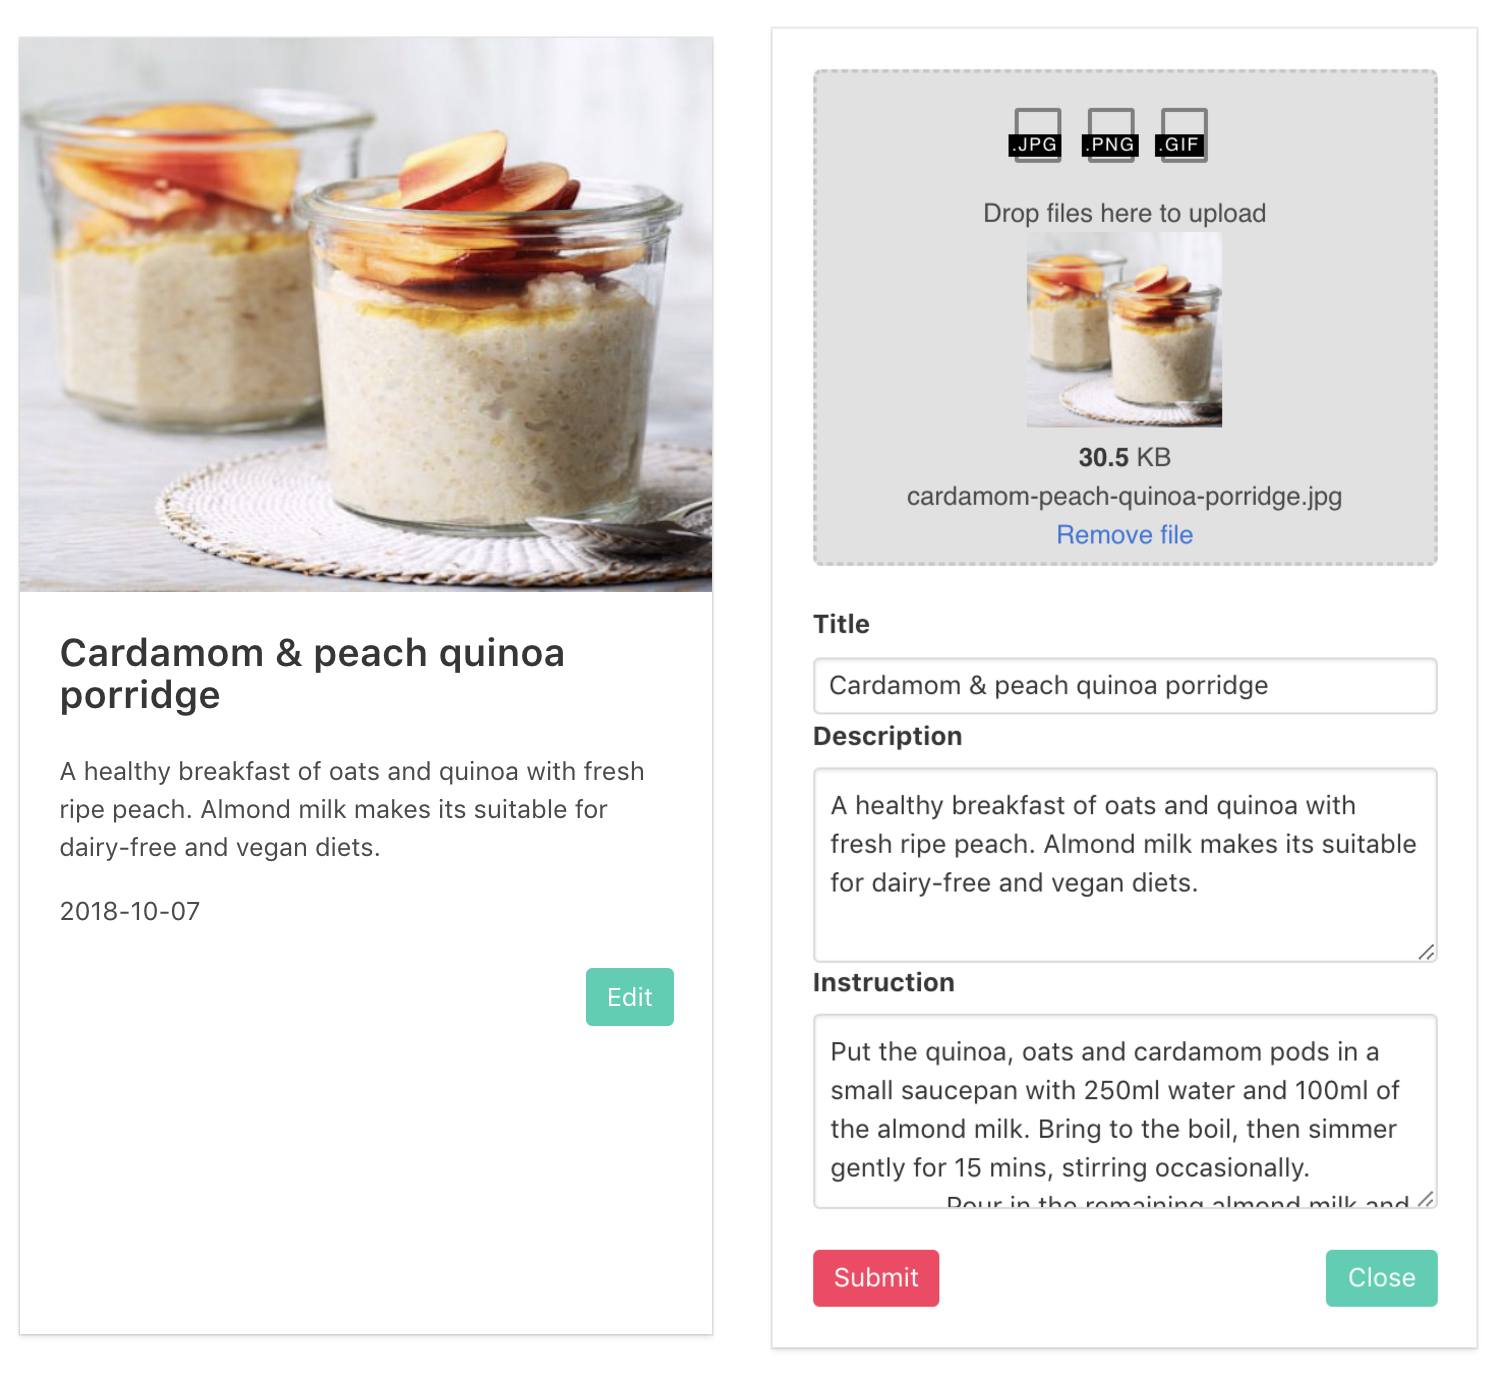
And that’s all! If you’re interested in more tutorials like this, make sure to check out our other blog posts.